In this quick walkthrough I want to go through a simple setup for creating a custom taxonomy and adding our own metadata field.
This is a common task when building out sites that feature full-fledged directories. For the default categories and tags within a blog, a title and description may be fine, but what about the make of a car for an auto-reseller? You may want to add additional info to the taxonomy terms themselves like what country the brand is from or even a logo file of the insignia.
For this example, we’ll be looking at a fictional real estate site where we have a property custom post type. Properties are sorted by a neighborhood taxonomy. We’ll add a custom field for a google maps link that pulls up the neighborhood in a new tab so that the user can explore and see what’s near by. We’ll do this all in custom plugin without using ACF, Custom Metabox, or any other additional helper plugins.
In a real setting, you might instead have a custom metadata field for latitude and longitude and then embed a map to explore all within your site, but this goes beyond the point of what we want to explore here. You can expand this same setup to accomplish something like this, however.
The setup
If you want to follow along with this tutorial, go ahead and spin up a fresh WordPress instance with the 2022 or 2023 theme.
Then create a new folder within your plugins directory called “property-directory”. We can just have an index.php file within this folder with the following boilerplate code:
<?php
/**
 * Plugin Name:       Property Directory
 * Plugin URI:        https://fullstackdigital.io
 * Description:       A plugin for a custom property post type and taxonomy.
 * Version:           1.0.0
 * Requires at least: 5.9
 * Requires PHP:      7.2
 * Text Domain:       fsd
 */

//  Prevents directly accessing plugin files
if(!function_exists('add_action')) {
  echo 'Seems like you got here by accident. 😛';
  exit;
}

// Setup
define('UP_PLUGIN_DIR', plugin_dir_path(__FILE__));
This gets us a plugin we can safely activate from within our WordPress admin. From here, let’s take a look at adding the custom post type.
Property post type & neighborhood taxonomy
To register a custom post type we’ll use the register_post_type() function within WordPress. This function has a ton of options you can read about within the documentation as well as a ton of custom labelling options. We’ll just use a basic setup for a standard post type that would support the Gutenberg editor:
add_action('init', 'fsd_property_post_type');
function fsd_property_post_type(){
  $labels = array(
		'name'                  => _x( 'Properties', 'Post type general name', 'fsd' ),
		'singular_name'         => _x( 'Property', 'Post type singular name', 'fsd' ),
		'menu_name'             => _x( 'Properties', 'Admin Menu text', 'fsd' ),
		'name_admin_bar'        => _x( 'Property', 'Add New on Toolbar', 'fsd' ),
	);

	$args = array(
		'labels'             => $labels,
		'public'             => true,
		'publicly_queryable' => true,
		'show_ui'            => true,
		'show_in_menu'       => true,
		'show_in_rest'       => true, // enables gutenberg and custom rest endpoint
		'query_var'          => true,
		'rewrite'            => array( 'slug' => 'property', 'with_front' => false ),
		'capability_type'    => 'post',
		'has_archive'        => true,
		'hierarchical'       => false,
		'menu_position'      => 20,
		'supports'           => array( 'title', 'editor', 'author', 'thumbnail', 'excerpt'),
	);

	register_post_type( 'property', $args );

}
Now, within our fsd_register_cpt() function after the post type let’s register a related taxonomy as well. It’s important this comes after because it will reference our custom post type.
We’ll call it neighborhood and set it to hierarchal. This gives us a nice checkbox interface within the editor.
  // ... Rest of function

  register_post_type( 'property', $args );

  register_taxonomy( 'neighborhood', 'property', [
    'label' => __('Neighborhood', 'fsd'),
    'rewrite' => ['slug' => 'neighborhood'],
    'hierarchical' => true,
    'show_in_rest' => true
  ] );
At this point, if you haven’t already, you can activate our custom plugin. When you refresh you should see the interface for creating property listings and neighborhoods in the sidebar.
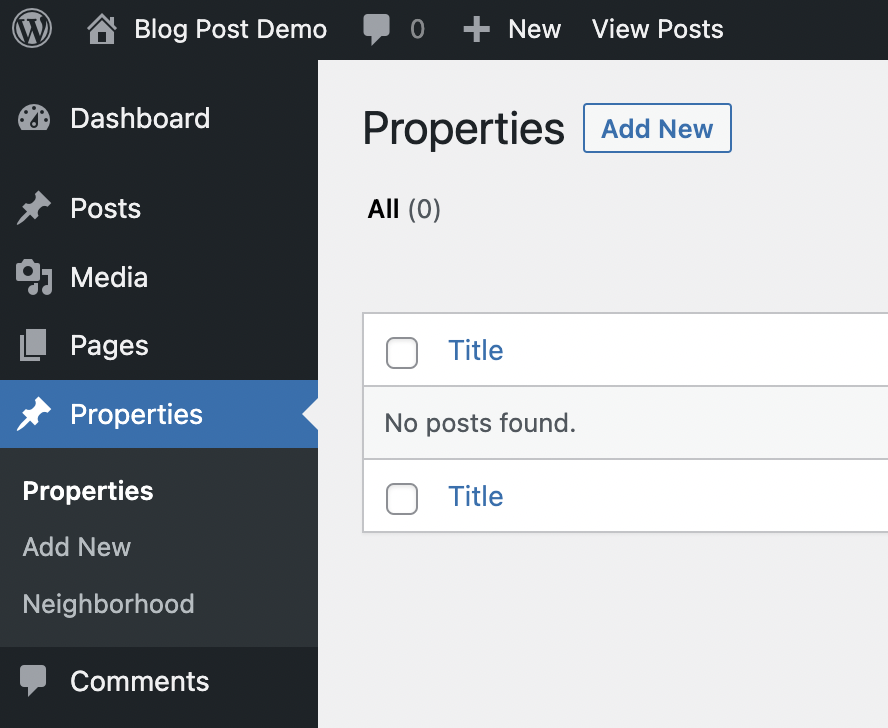
We are now ready to go ahead and add the custom field.
Add the maps field in the taxonomy editor
We will be adding a simple text field to be able to drop in a Google Maps link for our neighborhoods. In order to do this we need to add the field both on the create taxonomy screen, and the edit taxonomy screen:
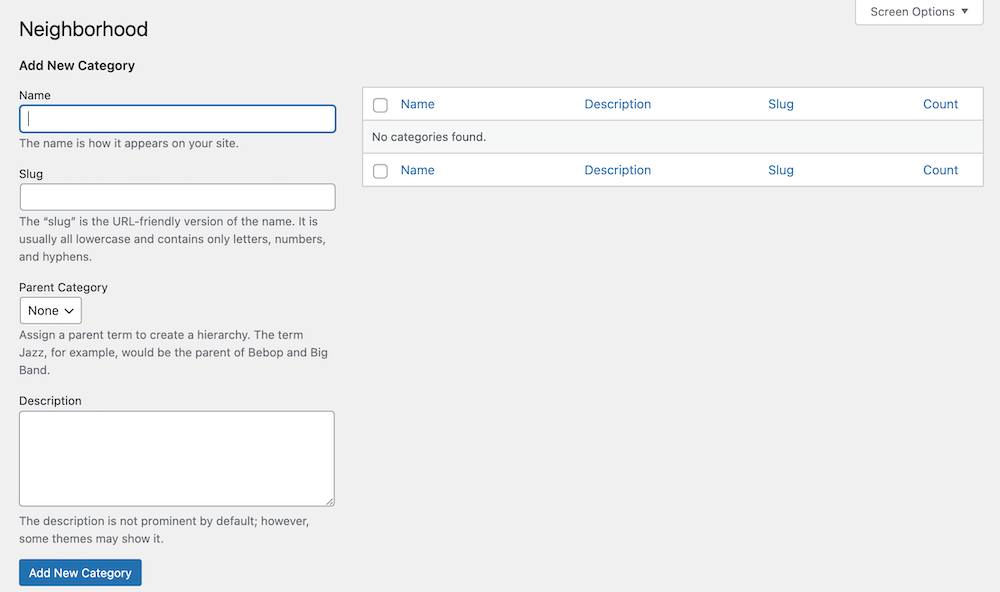
Let’s start with the create screen.
In order to do this, we need to use what’s called a dynamic hook. If you work with WordPress much certainly you are aware of using add_action to add functionality in various parts of the WP lifecycle like ‘init’, ‘after_theme_setup’, etc.
Dynamic hooks are similar, but the hook part is not just a simple string, you substitute in a value to direct what the hook is referring to.
In this case we will use the hook that looks like this in the documentation:
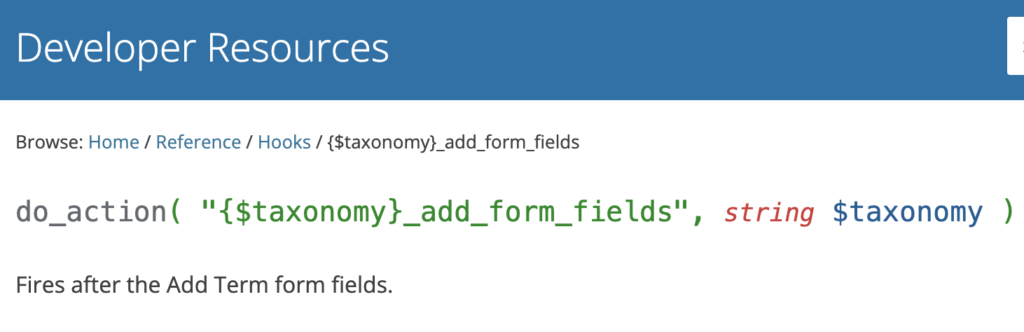
But since we are wanting to modify the neighborhood taxonomy our code will look like this:
add_action('neighborhood_add_form_fields', 'fsd_neighborhood_add_form_fields');Now let’s define the function referenced above:
<?php

function fsd_neighborhood_add_form_fields(){
  ?>

  <div class="form-field">
    <label for="fsd_google_url">Google Map URL</label>
    <input name="fsd_google_url" id="fsd_google_url" type="text" value="">
    <p id="fsd_google_url-description">A url to a map that shows the neighborhood.</p>
  </div>

<?php }
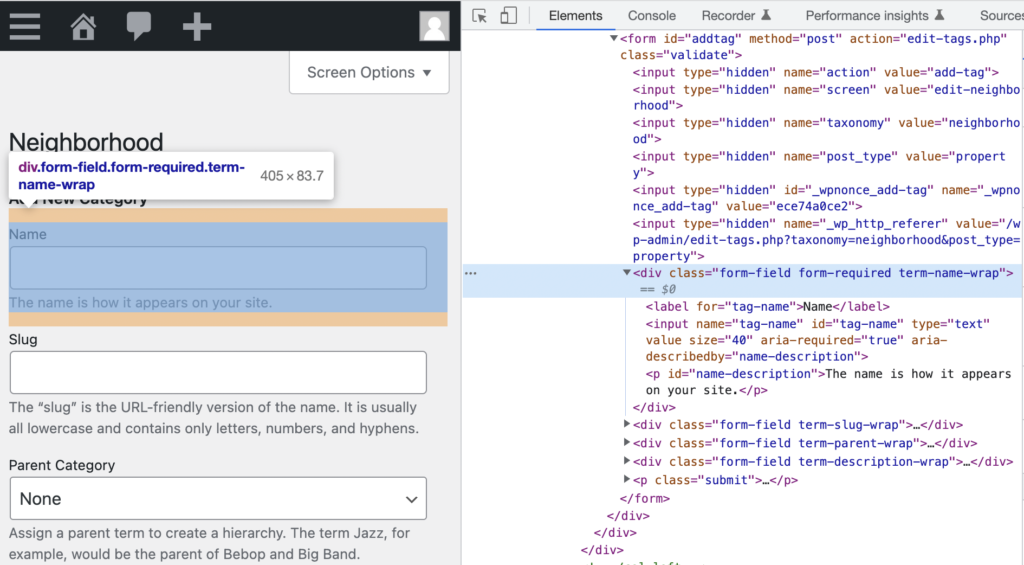
You can see that this is a really simple function. It simply returns an html input field with some special classes. We aren’t pulling these from thin air. If you inspect the admin page and look at the ‘name’ input we are using this as a template to build our own input.
Awesome. Now we just need this to get saved into the database. No problem, we just use another dynamic hook like the last one we used:
add_action('create_neighborhood', 'fsd_save_neighborhood_meta');And once again, we define a pretty simple function to go along with it:
function fsd_save_neighborhood_meta($term_id){
  if(!isset($_POST['fsd_google_url'])){
    return;
  }

  update_term_meta( $term_id, 'fsd_google_url', sanitize_url( $_POST['fsd_google_url'] ));
}
As you can see this function receives the term ID being saved as an argument. We just check if the field we created our HTML for earlier has a value in the submitted form by looking in the $_POST super global.
If not, we immediately return, which means the term just saves normally. Otherwise, if we do have a value, we run an additional piece of code that saves the piece of term metadata as well.
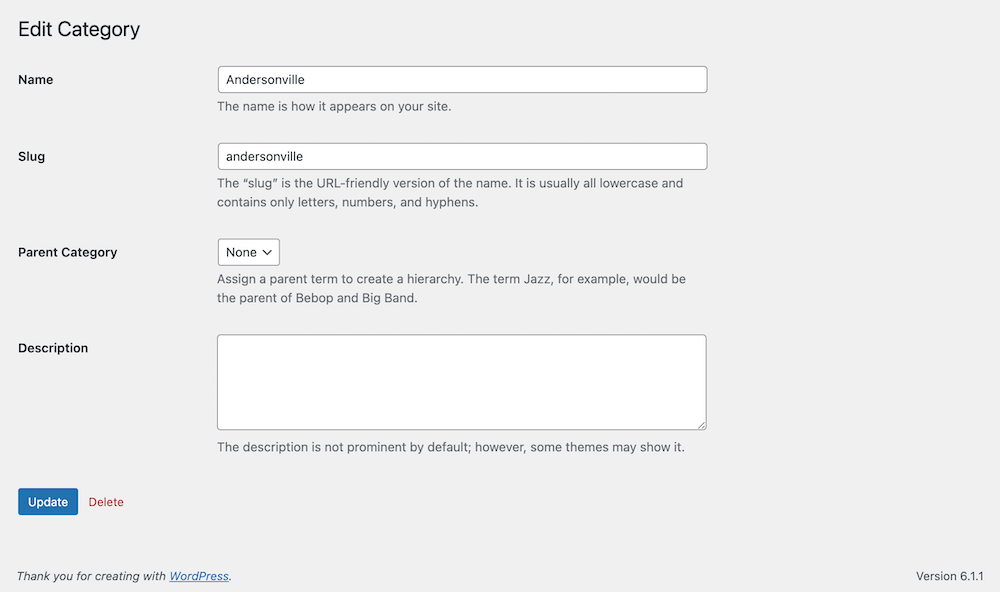
Adding the field to the edit screen
We can now create neighborhood terms with a piece of custom data associated with it. This is great!
Next, let’s just make sure we can edit the google link after creation. We’ll do almost the exact same steps as above. First, we use a custom hook, but this time for ‘edit’ not ‘add’. Then we output an html form element (Note: this is not just copy pasted! the edit screen uses a table to display the forms which we can view with the inspector and then build off of).
<?php
add_action('neighborhood_edit_form_fields', 'fsd_neighborhood_edit_form_fields');

function fsd_neighborhood_edit_form_fields($term) {

  $url = get_term_meta( $term->term_id, 'fsd_google_url', true );
  // The third argument is whether it is singular: true tells it not to return an array, just the one value

  ?>
    <tr class="form-field">
			<th scope="row"><label for="up_more_info_url">Google Maps URL</label></th>
			<td><input name="fsd_google_url" id="fsd_google_url" type="text" value="<?php echo $url ?>">
			<p class="description">A url to a map that shows the neighborhood.</p></td>
		</tr>
<?php }
The main thing worth calling out here is that this function receives the term being edited as an argument. Sadly, the term object does not have our metadata within it. No problem though, we can use get_term_meta() to grab the Google URL and fill in our input with the current value saved in the database.
We are almost done!
We just have to make sure it saves once again. This time it is super easy because we can actually just use the same function we did for the saving from the add term screen. This means all we have to do is add a one liner:
add_action('edited_neighborhood', 'fsd_save_neighborhood_meta');You can see we are hooking into ‘edited’ instead of ‘create’, but calling the same function that just checks for a value in the submitted form and saves it into the term meta table in our database.
Wrap up
If you made it this far give yourself a huge pat on the back!
We now have a fully functioning piece of custom metadata that extends our taxonomy. Sure, this particular one is nothing ground breaking, but you can use this technique to shape and extend the WordPress editor to support all kinds of data you may be dealing with.
Best of all, we didn’t need any plugins like ACF to accomplish this. Don’t get me wrong, ACF is a wonderful tool and I highly recommend investing in it to speed up your development workflow, but it is empowering to know how to accomplish things like this 100% within native WordPress.
If diving into metadata got you excited you may want to check out my post on using React in the admin to save and read post metadata as well!
