I’m super excited for this one!
In this write up we’ll take a look at creating a React powered plugin for WordPress and interact with the data layer to update post meta on our pages in a seamless way.
Better yet, we’ll build something that is actually useful, and could be extended to be a genuine workflow tool for your own development practice or agency.
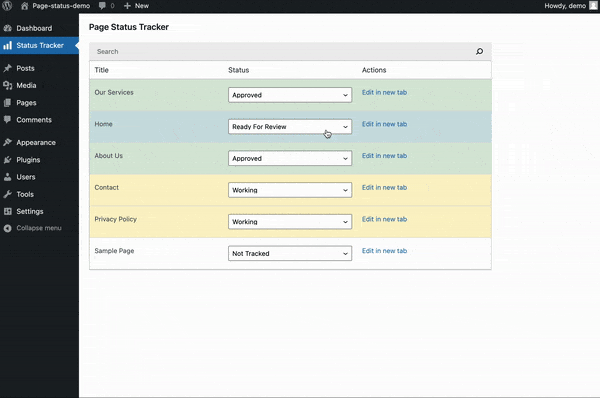
Do you keep track of which pages for a site are works-in-progress and which ones are done in a messy google sheet? We’re going to create a status tracker plugin right in the dashboard.
It will pull in your pages via REST, and feature a live-type search bar for if you need to find one quickly. It will list out all your pages with a status that you can quickly update while the plugin autosaves in the background. Finally, you will be able to quickly filter pages by their status, so you can easily focus on just the ‘working’ pages or show a list of what is ‘Ready For Review’.
Under the hood this is interacting with the REST API, storing edits in redux state, and asynchronously saving post metadata to the database.
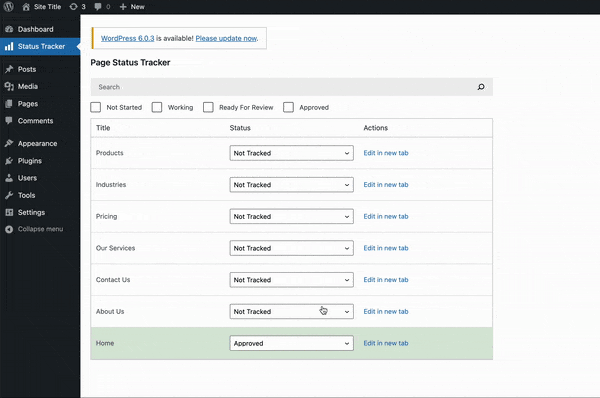
This has a bunch of great topics built it. We’ll fetch data from the redux data layer, edit it, and save into post meta tables. We’ll also have error handling with transient notifications.
You could expand this easily to add todo lists associated with each page, or an at a glance dashboard to give a sense of how much work is left.
More broadly these concepts will allow you to create React powered plugins that interact seamlessly with the WordPress data layer and database behind the scenes.
Starter Files
You can grab the starter files from this git repository and follow along!
(Also feel free to grab the finished app from this repo if you get stuck, or just want to explore.)
This is a pretty barebones starter with just some css styles for the layout and some boilerplate PHP for actually registering the plugin. We also have a package.json file, but you’ll notice the only dependency is @wordpress/scripts!
Once you’ve downloaded it, go ahead and run npm install.
Let’s run through the starter php file. First we are creating an admin menu page for our plugin. This also renders the div that will be our react entry point:
<?php
/**
 * Plugin Name: Status Tracker
 *
 */

function fsd_page_status_tracker_admin_menu() {
    // Create a new admin page for our app.
    // Includes an empty div with unique ID for React app entry point
    add_menu_page(
        'Status Tracker',
        'Status Tracker',
        'manage_options',
        'fsd-page-status-tracker',
        function () {
            echo '
            <h2>Page Status Tracker</h2>
            <div id="fsd-page-status-tracker"></div>
        ';
        },
        'dashicons-chart-bar',
        3
    );
}

add_action( 'admin_menu', 'fsd_page_status_tracker_admin_menu' );

...
In the next function, we are simple checking we are on the correct admin page, and then loading in our script and styles. You can see they are referencing the build folder that is created by @wordpress/scripts when we run it.
...
function fsd_load_custom_wp_admin_scripts( $hook ) {
    // Load only on our plugin page - ?page=fsd-page-status-tracker.
    if ( 'toplevel_page_fsd-page-status-tracker' !== $hook ) {
        return;
    }

    // Automatically load imported dependencies and assets version - generated by @wordpress/scripts.
    $asset_file = include plugin_dir_path( __FILE__ ) . 'build/index.asset.php';

    // Enqueue CSS dependencies.
    foreach ( $asset_file['dependencies'] as $style ) {
        wp_enqueue_style( $style );
    }

    // Load our app.js - reference version and dependencies from asset file
    wp_register_script(
        'fsd-page-status-tracker',
        plugins_url( 'build/index.js', __FILE__ ),
        $asset_file['dependencies'],
        $asset_file['version']
    );
    wp_enqueue_script( 'fsd-page-status-tracker' );

    // Load our style.css.
    wp_register_style(
        'fsd-page-status-tracker',
        plugins_url( 'style.css', __FILE__ ),
        array(),
        $asset_file['version']
    );
    wp_enqueue_style( 'fsd-page-status-tracker' );
}

add_action( 'admin_enqueue_scripts', 'fsd_load_custom_wp_admin_scripts' );
Install
Go ahead and drag the plugin starter files into the plugins folder for whatever site you will be testing on. I would advise a blank local dev site just to keep things clean and organized.
Open the files up in your favorite text editor and run npm run start. This will compile everything and create the build folder while watching for changes.
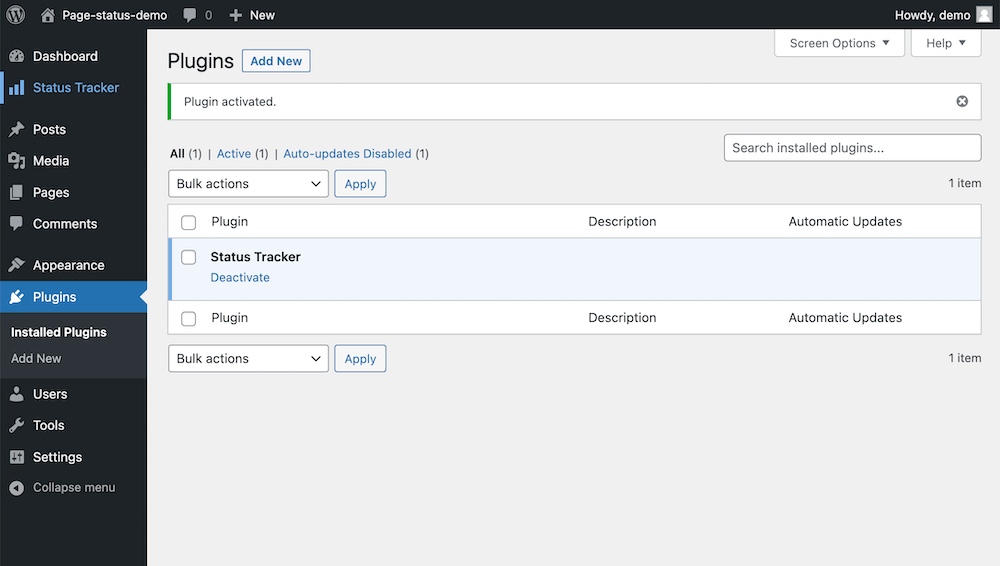
Now if you open up WordPress and go to your plugins you should see the Status Tracker plugin. You can go ahead and activate it and you’ll see an option appear at the top of the admin sidebar.
Right now if you navigate there you’ll just see a blank page with the title, but up next we’ll start hooking up our React app.
Hooking up React
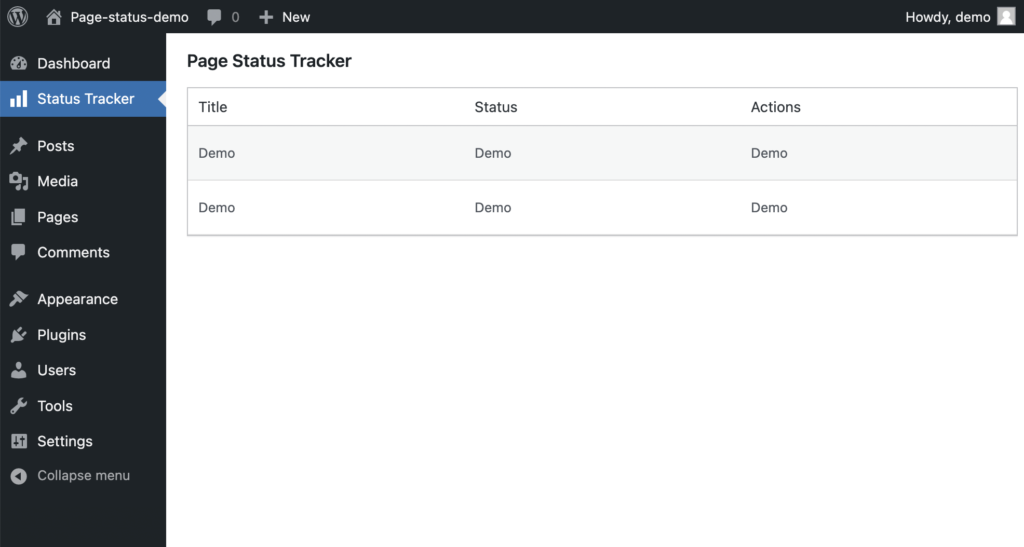
Go ahead and jump into the index.js file. This will be where we create our main app. For now, lets create a function called StatusTrackerApp and just render a table element where we will populate all our pages:
function StatusTrackerApp() {
  return (
    <table className="wp-list-table widefat fixed striped table-view-list">
        <thead>
            <tr>
                <th>Title</th>
                <th>Status</th>
                <th>Actions</th>
            </tr>
        </thead>
        <tbody>
            <tr>
              <td>Demo</td>
              <td>Demo</td>
              <td>Demo</td>
            </tr>
            <tr>
              <td>Demo</td>
              <td>Demo</td>
              <td>Demo</td>
            </tr>
        </tbody>
    </table>
  );
}
Now we just need to attach this React app to the empty div getting rendered on our plugin page:
import { render } from '@wordpress/element';

function StatusTrackerApp() {
  // Table ...
}

// Load in our react app to the DOM
window.addEventListener(
    'load',
    function () {
        render(
            <StatusTrackerApp />,
            document.querySelector( '#fsd-page-status-tracker' )
        );
    },
    false
);
If you refresh you’ll now see the table element in the dashboard! (Make sure npm run start is still running in the background to compile everything).
The Data Layer
Let’s pull in our pages using the WordPress data layer. First, go ahead and create a handful of pages so that we have some real data to work with.
You can do this using the provided useSelect() hook. This looks a lot like useEffect if you are coming from traditional React: it takes a callback function and a dependency array as arguments, but in the callback you return an object of the data you are pulling from the WP data layer.
This is how it looks pulling all our pages from the store:
import { render } from '@wordpress/element';
import { useSelect } from '@wordpress/data';
import { store as coreDataStore } from '@wordpress/core-data'; // this acts as redux store we can save and select from
function StatusTrackerApp() {
// useSelect acts similar to a useEffect and can grab data out of redux store for us to use - also has familiar dependency array
const {pages} = useSelect(
select => {
return {
pages: select( coreDataStore ).getEntityRecords( 'postType', 'page' ),
}
}, []
);
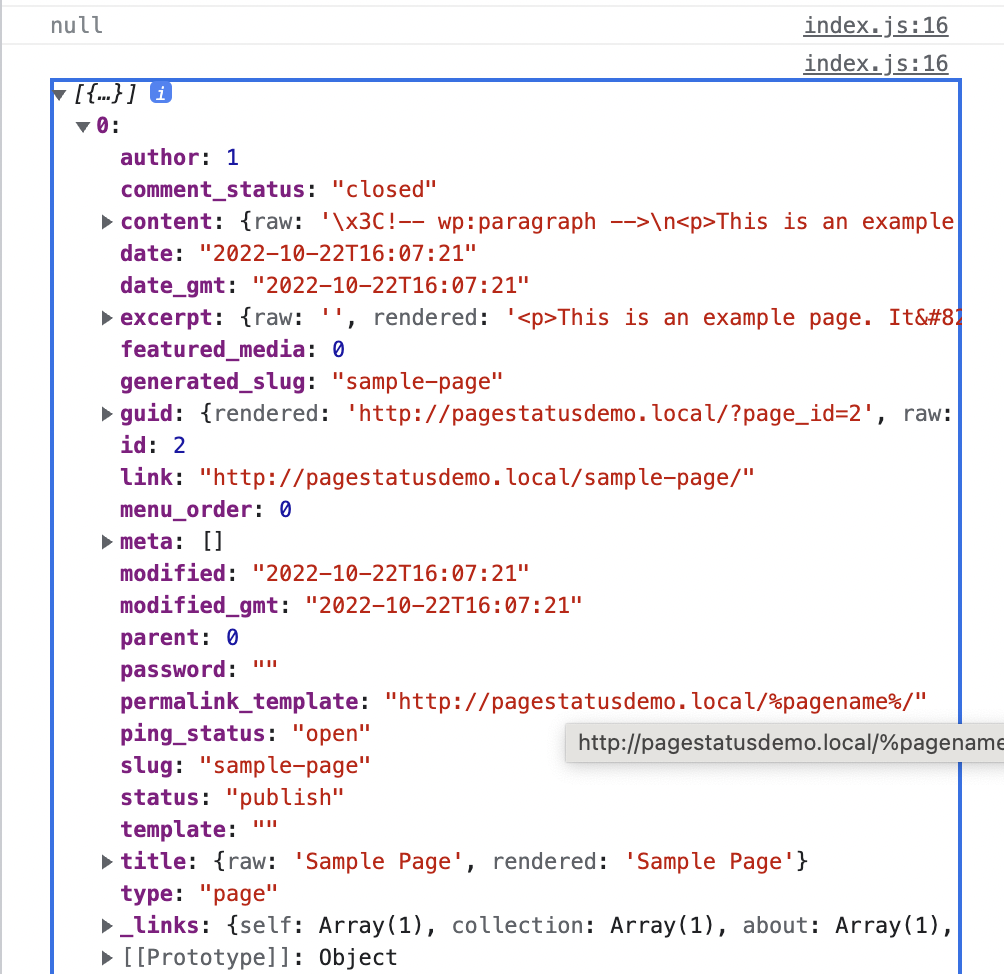
console.log(pages)
return (
// ...
)
}Go ahead and console.log your pages variable and explore what is available. You’ll see a ton of data is included in the REST response that we can use now in our plugin.
To start, lets just map over the pages and output the title to our table:
...
  return (
    <table className="wp-list-table widefat fixed striped table-view-list">
        <thead>
            <tr>
                <th>Title</th>
                <th>Status</th>
                <th>Actions</th>
            </tr>
        </thead>
        <tbody>
            { pages?.map( page => (
              <tr key={page.id}>
                <td>{page.title.rendered}</td>
                <td></td>
                <td></td>
              </tr>
            ) ) }
        </tbody>
    </table>
  );
...
Great! Now let’s also add a quick link to edit the page in a new tab. We want the format to look like this:
{site url}/wp-admin/post.php?post={id}&action=edit
To do this we’ll want to grab the absolute url in case the WordPress install is in a subdirectory. To make this available in javascript we’ll go back to our php file and add a localize script function that will pass the data through:
...
  // Load our app.js.
    wp_register_script(
        'fsd-page-status-tracker',
        plugins_url( 'build/index.js', __FILE__ ),
        $asset_file['dependencies'],
        $asset_file['version']
    );
    wp_enqueue_script( 'fsd-page-status-tracker' );

    wp_localize_script( 'fsd-page-status-tracker', 'localizedData',
		array(
			'homeUrl' => home_url(),
		)
	);
...
Now we can modify our mapping function to include this is in the table with the correct edit url using the page ID:
...
  return (
    <table className="wp-list-table widefat fixed striped table-view-list">
        <thead>
            <tr>
                <th>Title</th>
                <th>Status</th>
                <th>Actions</th>
            </tr>
        </thead>
        <tbody>
            { pages?.map( page => (
              <tr key={page.id}>
                <td>{page.title.rendered}</td>
                <td></td>
                <td><a target="_blank" href={`${localizedData.homeUrl}/wp-admin/post.php?post=${page.id}&action=edit`}>Edit in new tab</a></td>
              </tr>
            ) ) }
        </tbody>
    </table>
  );
...
Great! At this point all that is missing is the actual status field. This will be a dropdown that pulls from a post meta field. We’ll come back to this in a moment, but for now let’s also add a search bar so we can quickly find pages as well.
Live Type Searching
In this step, we’ll add a search bar that connects with our useSelect hook so that the user can type and the search results will update in real time.
First, in our index.js let’s just pull in the search bar component from WordPress:
import { SearchControl } from '@wordpress/components';WordPress provides a ton of great pre-built components you can grab from this package. A full reference can be found in the official documentation here. We’ll use a handful throughout this project.
Now let’s transform this into a controlled input with useState. WordPress provides us with all the core React hooks including this, through the @wordpress/element package:
import { render, useState } from '@wordpress/element'; // Add useState in import

function StatusTrackerApp() {

  const [searchTerm, setSearchTerm] = useState( '' );

  ... useSelect here ...

  return (
    <div>
      <div className='list-controls'>
        <SearchControl
          onChange={ setSearchTerm }
          value={ searchTerm }
        />
      </div>
      <table className="wp-list-table widefat fixed striped table-view-list">
          <thead>
              <tr>
                  <th>Title</th>
                  <th>Status</th>
                  <th>Actions</th>
              </tr>
          </thead>
          <tbody>
              { pages?.map( page => (
                <tr key={page.id}>
                  <td>{page.title.rendered}</td>
                  <td></td>
                  <td><a target="_blank" href={`${localizedData.homeUrl}/wp-admin/post.php?post=${page.id}&action=edit`}>Edit in new tab</a></td>
                </tr>
              ) ) }
          </tbody>
      </table>
    </div>
  );
}
From here, we just need to revisit our useSelect callback. We can add a third argument which is an object containing options for filtering and ordering our results. For our purposes, we just need the following:
  // useSelect acts similar to a useEffect and can grab data out of redux store for us to use - also has familiar dependency array
  const {pages} = useSelect(
    select => {
      const query = {}
      if(searchTerm){
        query.search = searchTerm
      }
       // select first takes the kind of query, then the name, then an object of query params for filtering
      return {
        pages: select( coreDataStore ).getEntityRecords( 'postType', 'page', query ),
      }
    }, [searchTerm]
  );
At this point if we open our plugin and start typing we’ll see the posts in our table filter in real time!
We can still make this experience a lot better with a loading state however.
Adding a Loading State
Let’s start by importing a generic spinner from the WordPress components package.
import { SearchControl, Spinner } from '@wordpress/components';Now we need a way of knowing if our request has come back yet. WordPress provides this through another method hasFinishedResolution that we will add to our useSelect hook:
  const {pages, hasResolved} = useSelect(
    select => {
      const query = {}
      if(searchTerm){
        query.search = searchTerm
      }
       // select first takes the kind of query, then the name, then an object of query params for filtering
      return {
        pages: select( coreDataStore ).getEntityRecords( 'postType', 'page', query ),
        // has resolved accepts selector name and EXACT arguments and returns true/false (kind of like removeEventListener)
        hasResolved: select( coreDataStore ).hasFinishedResolution( 'getEntityRecords', ['postType', 'page', query] )
      }
    }, [searchTerm]
  );
The tricky thing here is that this method needs to be passed the exact parameters as the getEntityRecords method to link up with it as an array, similar to how removeEventListener works if you are familiar with that.
To reduce the chance for errors if we make future changes to our hooks, we can pull out the arguments into a variable and just pass that variable into both methods so they are always in sync:
       // select first takes the kind of query, then the name, then an object of query params for filtering
      const selectorArgs = ['postType', 'page', query]
      return {
        pages: select( coreDataStore ).getEntityRecords( ...selectorArgs ),
        // has resolved accepts selector name and EXACT arguments and returns true/false (kind of like removeEventListener)
        hasResolved: select( coreDataStore ).hasFinishedResolution( 'getEntityRecords', selectorArgs )
      }
Now we can use this hasResolved variable to conditionally display a spinner if the request is still loading, or the table once it is finished:
  return (
    <div>
      <div className='list-controls'>
        <SearchControl
          onChange={ setSearchTerm }
          value={ searchTerm }
        />
      </div>
      {!pages?.length && !hasResolved ? (
        <Spinner />
      ) : (
        <table className="wp-list-table widefat fixed striped table-view-list">
          <thead>
              <tr>
                  <th>Title</th>
                  <th>Status</th>
                  <th>Actions</th>
              </tr>
          </thead>
          <tbody>
              { pages?.map( page => (
                <tr key={page.id}>
                  <td>{page.title.rendered}</td>
                  <td></td>
                  <td><a target="_blank" href={`${localizedData.homeUrl}/wp-admin/post.php?post=${page.id}&action=edit`}>Edit in new tab</a></td>
                </tr>
              ) ) }
          </tbody>
        </table>
      )}
    </div>
  );
Custom Post Meta
Now that we’ve got our table built and our search bar functioning, it’s time to add in the actual status picker functionality.
First, we need to add a custom post meta field to our pages and make sure it is exposed to the REST API. We’ll do this in our main plugin php file:
...
function fsd_register_meta() {
    register_meta('post', '_fsd_page_status', array(
      'show_in_rest' => true,
      'type' => 'integer',
      'single' => true,
      'auth_callback' => function() {
        return current_user_can('edit_posts');
      }
    ));
  }
add_action('init', 'fsd_register_meta');
Let’s go ahead build our select component. I’m going to pull out each table row into its own component in src/components/PageRow.js. Then we’ll import and use it so our index.js return statement looks like this:
import PageRow from './components/PageRow';

...

return (
    <div>
      <div className='list-controls'>
        <SearchControl
          onChange={ setSearchTerm }
          value={ searchTerm }
        />
      </div>
      {!pages?.length && !hasResolved ? (
        <Spinner />
      ) : (
        <table className="wp-list-table widefat fixed striped table-view-list">
          <thead>
              <tr>
                  <th>Title</th>
                  <th>Status</th>
                  <th>Actions</th>
              </tr>
          </thead>
          <tbody>
              { pages?.map( page => (
                <PageRow pageId={page.id}/>
              ) ) }
          </tbody>
        </table>
      )}
    </div>
  );
And now we can jump into our row component and import a select UI component from WordPress and drop it in our second table data column:
import { SelectControl } from '@wordpress/components';

export default function PageRow({title, pageId}){

  const handleChange =  ( updatedStatus ) => {
    console.log(updatedStatus)
  }

  return (
    <tr>
      <td>{title}</td>
      <td>
        <SelectControl
            value={ 0 }
            options={ [
                { label: 'Approved', value: 3 },
                { label: 'Ready For Review', value: 2 },
                { label: 'Working', value: 1 },
                { label: 'Not Tracked', value: 0 },
            ] }
            onChange={ ( newStatus ) => handleChange(newStatus) }
        />
      </td>
      <td><a target="_blank" href={`${localizedData.homeUrl}/wp-admin/post.php?post=${pageId}&action=edit`}>Edit in new tab</a></td>
    </tr>
  )

}
A Note on structure
For demo purposes we are going to hard code our status options and map them to numeric values 0-3. A great way to push this project further would be to add the ability to customize what these status options are by using an editable taxonomy instead of post meta, but for this app I wanted to show interactions with post meta specifically, since post meta is a powerful tool that is more widely applicable to all kinds of use cases.
If you refresh you’ll notice the select is there, but you can’t change the value. We’ll link this up to the data layer to make it dynamic.
Post Meta Data Layer
Now we need to link this to the data layer once again. Here we are going to do something a little different. We are going to use the getEditedEntityRecord method in which stores the state of the page with any pending edits that have not been saved yet, and reflects them in the UI.
This allows the select field to update real time and reflect changes while the post meta value is saved in the background.
It’s basically just a copy of the page object stored in state that we can edit as much as we want, and then save into the actual database asynchronously.
Here’s how using it looks:
import { SelectControl } from '@wordpress/components';
import { useSelect } from '@wordpress/data';
import { store as coreDataStore } from '@wordpress/core-data';

export default function PageRow({title, pageId}){

  const { page } = useSelect(
    // we use get Edited here to be able to reflect updates realtime
      select => ({
          page: select( coreDataStore ).getEditedEntityRecord( 'postType', 'page', pageId ),
      }), [pageId]
  );

  const handleChange =  ( updatedStatus ) => {
    console.log(updatedStatus)
  }

  ...

}
Now we can actually check this page object and populate the select field accordingly:
        <SelectControl
            value={ page.meta._fsd_page_status }
            options={ [
                { label: 'Approved', value: 3 },
                { label: 'Ready For Review', value: 2 },
                { label: 'Working', value: 1 },
                { label: 'Not Tracked', value: 0 },
            ] }
            onChange={ ( newStatus ) => handleChange(newStatus) }
        />
Of course if you refresh everything will still show “Not Tracking” since we haven’t saved any post meta yet, and if you try to change the field nothing will happen since our handle change doesn’t do anything yet. Let’s link that up now.
Editing and Saving in the Data Layer
First, we need to handle the onChange event for our select. We’ll define a function called handleChange in our component to take care of this.
What we want to do is not just update a piece of state, but actually push our changes to the editedEntity object within the WordPress data layer. To do this we’ll use another hook useDispatch.
We’ll import it and call it, passing in the coreDataStore similar to how we did with useSelect, but this time we’ll just destructure the functions it returns:
import { useSelect, useDispatch } from '@wordpress/data';

...

export default function PageRow({title, pageId}){

  // edit entity record keeps track of edits seperately in redux store so we can globally access edited state
  const { editEntityRecord, saveEditedEntityRecord } = useDispatch( coreDataStore );

...

}
Now we have two functions at our disposal, one to push edits into the data layer, and another to actually save the edited data layer object into the database.
Let’s start by using the first one.
Editing the Post Meta
We’ll update our handleChange function to use a try/catch and use our new editEntityRecord function passing in the page we want to edit, and an object with the edits we wish to apply.
  const handleChange = async ( updatedStatus) => {
    try{
      await editEntityRecord( 'postType', 'page', page.id, { meta:{_fsd_page_status: updatedStatus}} )
    } catch(e) {
      console.log('Error: ' + e)
      return
    }
    // handleSave(); - We'll build this in a minute
  };
This is a very powerful function that allows you to make a ton of edits to different fields all stored in the data layer and then save at once. You could basically build your own complete custom editing interface for post types if you desired.
For now we are just going to log out any errors, but we will actually add transient snackbar messages a little bit later.
Finally you’ll notice at the end of the handleChange, there is a commented out handleSave. We’ll tackle this next, but first you can now go the dashboard and verify you are able to toggle between statuses, and if you have React dev tools, you can see the changes being applied within the data layer as well (of course refreshing will reset everything still).
Saving the Post Meta
Now let’s handle the actual save. We will uncomment where we are calling this on each change event so that it will just save changes in the background.
We can define a handleSave function which will look very similar to our edit function. We await a response from the saveEditedEntityRecord method and if it returns null, we know the save operation failed and can log an error.
// Deal with saving - aysnc operation
const handleSave = async () => {
const updatedRecord = await saveEditedEntityRecord( 'postType', 'page', pageId); //returns promise resolved after save
if ( !updatedRecord ) { // will be null if save operation failed
console.log('Error Saving')
}
};
const handleChange = async ( updatedStatus) => {
try{
await editEntityRecord( 'postType', 'page', page.id, { meta:{_fsd_page_status: updatedStatus}} )
} catch(e) {
console.log('Error: ' + e)
return
}
handleSave();
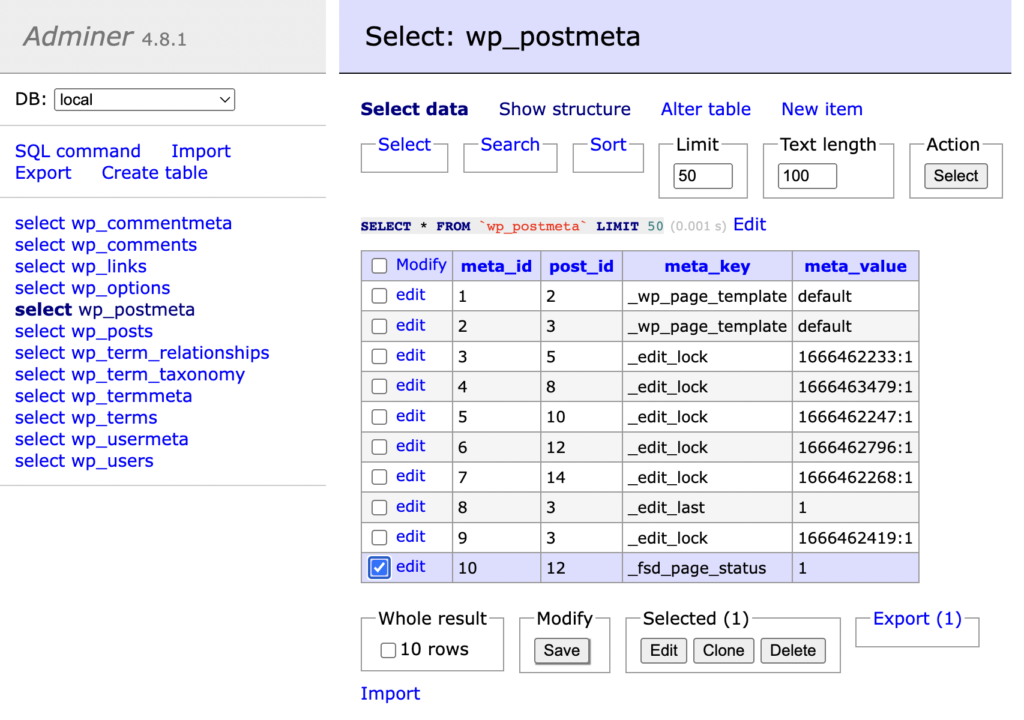
};At this point you’ll be able to change statuses and it will actually save in the database! We can verify by changing one, waiting a second for the save to happen and refreshing the page. You can also change the status and then peek in the database and you’ll see the new entry in the postmeta table:
Displaying Save Status
Since the save is asynchronous though, let’s give the user an indication when things are in the process of saving.
Back up at the top where we have our useSelect, we’ll add another piece of data. This method is called isSavingEntityRecord and returns just that! We call it with the same parameters, and will destructure the returned value into a variable called isSaving:
  const { page, isSaving } = useSelect(
    // we use get Edited here to be able to reflect updates realtime
      select => ({
          page: select( coreDataStore ).getEditedEntityRecord( 'postType', 'page', pageId ),
          isSaving: select( coreDataStore ).isSavingEntityRecord( 'postType', 'page', pageId ),

      }), [pageId]
  );
We’ll now add a conditional in our return statement that displays a spinner from the WordPress components package and the text “saving” if a save is in process, and otherwise the status dropdown. (Don’t forget to import the spinner package!)
Also, let’s add a custom class to the row based on its status. There is some custom css in our style.css file that will then change the background color to give us better at-a-glance feedback:
import { SelectControl, Spinner } from '@wordpress/components';

...

  return (
    <tr className={`status-code-${[page.meta._fsd_page_status]}`}>
      <td>{title}</td>
      <td>
        { isSaving ? (
            <>
                <Spinner/>
                Saving
            </>
        ) : (
        <SelectControl
            value={ page.meta._fsd_page_status }
            options={ [
                { label: 'Approved', value: 3 },
                { label: 'Ready For Review', value: 2 },
                { label: 'Working', value: 1 },
                { label: 'Not Tracked', value: 0 },
            ] }
            onChange={ ( newStatus ) => handleChange(newStatus) }
        />
        )}
      </td>
      <td><a target="_blank" href={`${localizedData.homeUrl}/wp-admin/post.php?post=${pageId}&action=edit`}>Edit in new tab</a></td>
    </tr>
  )
Nice! Now we get a really clear indication of when statuses are being saved and when we are free to refresh the page or navigate away.
Handling Errors
In the last section you may have noticed we skipped over potential errors with just a console log. Obviously, this is not ideal, so let’s go back and use some WordPress provided tools to handle these more elegantly.
We are going to use the data layer again, but this time we’ll hook into the “notices store”. This will allow us to display little snackbar messages with useDispatch from anywhere in our application.
We’ll make a new component called Notifications.js in our src/components directory. One cool thing here is this component is stand-alone and can be dropped into any plugin you create to add this functionality.
import { SnackbarList } from '@wordpress/components';
import { store as noticesStore } from '@wordpress/notices';
import { useDispatch, useSelect } from '@wordpress/data';

export default function Notifications() {
  const notices = useSelect(
      ( select ) => select( noticesStore ).getNotices(),
      []
  );
  const { removeNotice } = useDispatch( noticesStore );
  const snackbarNotices = notices.filter( ({ type }) => type === 'snackbar' );

  return (
      <SnackbarList
          notices={ snackbarNotices }
          className="components-editor-notices__snackbar"
          onRemove={ removeNotice }
      />
  );
}
For us, we’ll just import in our index.js file and drop it in under our pages list:
import Notifications from './components/Notifications';

...

return (
    <div>
      <div className='list-controls'>
        <SearchControl
          onChange={ setSearchTerm }
          value={ searchTerm }
        />
      </div>
      {!pages?.length && !hasResolved ? (
        <Spinner />
      ) : (
        <table className="wp-list-table widefat fixed striped table-view-list">
          <thead>
              <tr>
                  <th>Title</th>
                  <th>Status</th>
                  <th>Actions</th>
              </tr>
          </thead>
          <tbody>
              { pages?.map( page => (
                <PageRow title={page.title.rendered} pageId={page.id}/>
              ) ) }
          </tbody>
        </table>
      )}
      <Notifications />
    </div>
  );
Now we can go back to our Page Row component and use destructuring to get the createErrorNotice function from our notices store.
import { store as noticesStore } from '@wordpress/notices';

...

export default function PageRow({title, pageId}){

  const { createErrorNotice } = useDispatch( noticesStore );

...
}
In our save and edit function we can use this to pass an error message and display it in a transient little slide-in snackbar component.
  // Deal with saving - aysnc operation
  const handleSave = async () => {
      const updatedRecord = await saveEditedEntityRecord( 'postType', 'page', pageId); //returns promise resolved after save
      if ( !updatedRecord ) { // will be null if save operation failed
        // Tell the user how exactly the delete has failed
        const message = 'An Error Occurred While Saving...'
        // Tell the user how exactly the operation has failed:
        createErrorNotice( message, {
            type: 'snackbar',
        } );
      }
  };

  const handleChange = async ( updatedStatus) => {
    try{
      await editEntityRecord( 'postType', 'page', page.id, { meta:{_fsd_page_status: updatedStatus}} )
    } catch(e) {
      const message = 'An Error Occurred While Editing...'
      // Tell the user how exactly the operation has failed:
      createErrorNotice( message, {
          type: 'snackbar',
      } );
      return
    }
    handleSave();
  };
We can do better than a generic error, however. Going back to our useSelect we can add one more variable to destructure out called lastError and call getLastEntitySaveError with the same arguments as our others. We can then pass this into our error message with a fallback in case one is not generated.
const { page, isSaving, lastError } = useSelect(
// we use get Edited here to be able to reflect updates realtime
select => ({
page: select( coreDataStore ).getEditedEntityRecord( 'postType', 'page', pageId ),
isSaving: select( coreDataStore ).isSavingEntityRecord( 'postType', 'page', pageId ),
lastError: select( coreDataStore ).getLastEntitySaveError( 'postType', 'page', pageId )
}), [pageId]
);
...
// Deal with saving - aysnc operation
const handleSave = async () => {
const updatedRecord = await saveEditedEntityRecord( 'postType', 'page', pageId); //returns promise resolved after save
if ( !updatedRecord ) { // will be null if save operation failed
// Tell the user how exactly the delete has failed
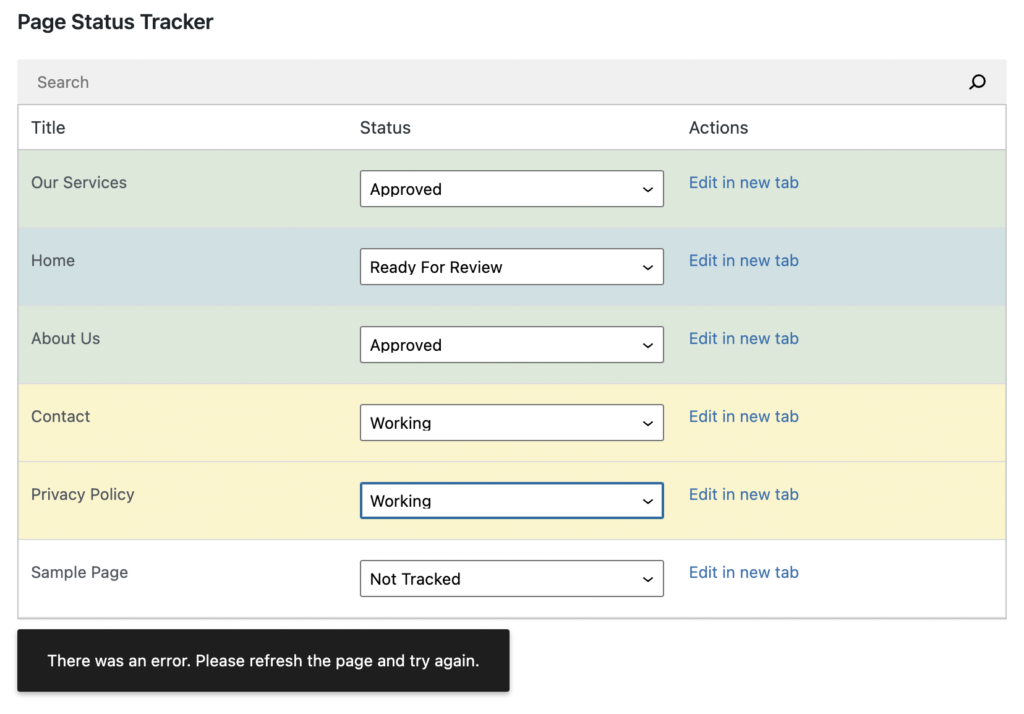
const message = ( lastError?.message || 'There was an error.' ) + ' Please refresh the page and try again.'
// Tell the user how exactly the operation has failed:
createErrorNotice( message, {
type: 'snackbar',
} );
}
};
const handleChange = async ( updatedStatus) => {
try{
await editEntityRecord( 'postType', 'page', page.id, { meta:{_fsd_page_status: updatedStatus}} )
} catch(e) {
const message = ( lastError?.message || 'There was an error.' ) + ' Please refresh the page and try again.'
// Tell the user how exactly the operation has failed:
createErrorNotice( message, {
type: 'snackbar',
} );
return
}
handleSave();
};Go ahead and add a multiplier to the pageId variable so that it will try to edit a nonexistent page and try changing the status. You’ll see a little error pop up and then fade out after a short time:
try {
      await editEntityRecord( 'postType', 'page', page.id * 200, { meta:{_fsd_page_status: updatedStatus}} )

}
Wrap up
We now have a fully functional plugin powered by React that is able to manipulate post meta through the data layer! This is a major accomplishment and opens the door to all kinds of tools and interfaces you can develop in the WordPress admin.
I’ll be adding one more section to this article in the next week or so that adds checkbox filters like in the demo video at the beginning of this walkthrough, so consider signing up to my newsletter if you want to be notified when this section gets added.
Or if you’re feeling adventurous give it a try yourself! It’s actually less complex than much of what we just did 😉
I hope this has inspired you to experiment more with modern javascript + WordPress!

Leave a Reply