I recently built a custom block on WordPress that allowed the content editor to fetch data from the google API to populate some attributes automatically. Doing this required a Google API key, and safely storing and using the key requires some extra considerations. I thought I would share a quick walkthrough on how I accomplish this in my plugins.
The basic idea is because we don’t want to store the key in our client Javascript, we’ll create a custom REST endpoint that we’ll send a fetch request to. Then server-side our endpoint handler will hit the external API providing a secure key. Finally, we’ll return the data we get back from the API to our client script. This way we never expose the API key to the front end. Our custom REST endpoint acts as a middleman to safely call the API.
Your client script could either be a Gutenberg block, or just regular javascript for form submissions on your website for instance.
Here are a few examples of how this setup could be used:
- Pull data from a Google sheet or Airtable into a custom block
- Subscribe users with a custom form via MailChimp API for instance
- Use ChatGPT or an Image API to hook into AI content generation from the block editor
(Maybe a detailed write up on one or two of these will come in the next couple weeks)
Feel free to grab the finished starter kit repo for reference.
Let’s jump into it!
Safe places to store an API key in WordPress
Technically, if you are trying to hit an API from a custom block, the script for a Gutenberg block should only run within the admin and should not expose a key to visitors, but that still does not mean it’s a good idea to put an API key in there.
We really have two options for storing sensitive data like API keys:
We could define a constant in our WP config file, or we could store the key in the database.
Adding it to the WP config file is certainly easier, but it is also a lot less flexible. If you store the key in the database you can create an options page in the WordPress admin that allows website managers to input their own API key without modifying code.
That said, storing keys in the database has its own security considerations. it is generally not a good idea to store sensitive information in the database in plain text. If someone nefarious has access to your database, you likely have bigger problems than potentially compromising an API key, but just to be safe we will go the extra mile and encrypt or API key before storing it.
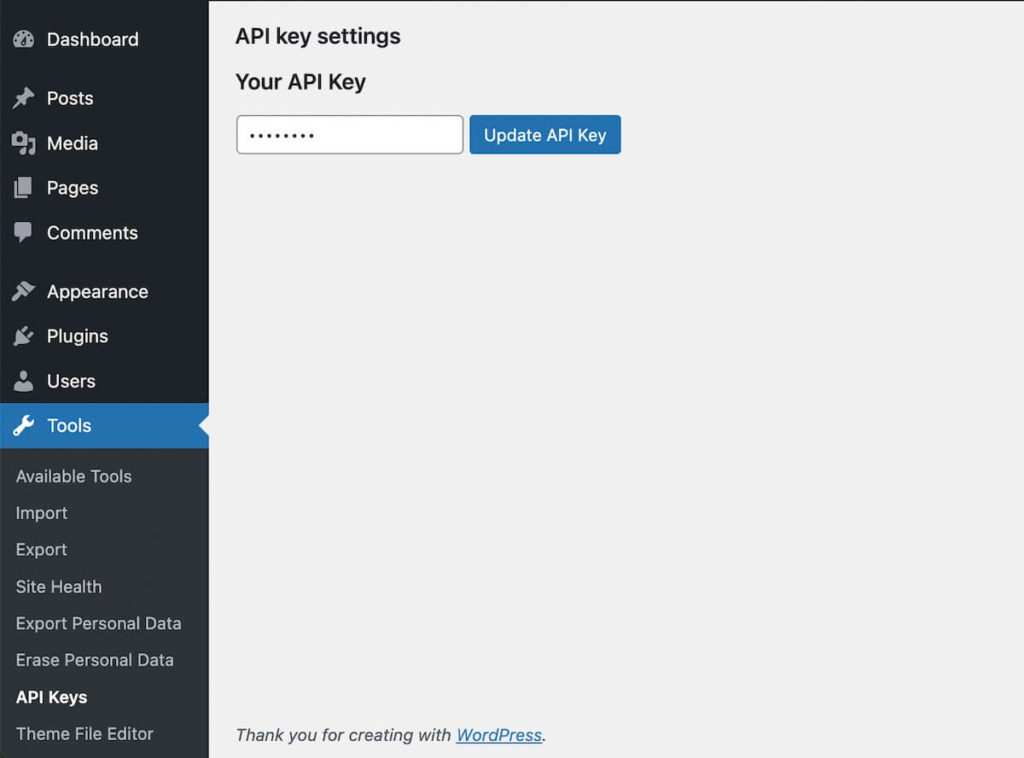
Create a settings page
The first step is to create a settings page for managing our custom option. I’ll add this page under “Tools” in the WordPress sidebar:
add_action('admin_menu', 'fsdapikey_register_my_api_keys_page');

function fsdapikey_register_my_api_keys_page() {
  add_submenu_page(
    'tools.php', // Add our page under the "Tools" menu
    'API Keys', // Title in menu
    'API Keys', // Page title
    'manage_options', // permissions
    'api-keys', // slug for our page
    'fsdapikey_add_api_keys_callback' // Callback to render the page
  );
}
This registers the options page and identifies a callback function to render on the new settings page. Let’s build out that function now.
We could use the WordPress Settings API to build this page, but I prefer to just use standard HTML. We just have to make sure to handle the security ourselves. We’ll add a nonce to make sure our form can only be submitted from the admin and not spoofed.
We also have to provide an action input to which will identify to WordPress what function to run when the form is submitted:
function fsdapikey_add_api_keys_callback() { ?>

    <div class="wrap"></div>
        <h2>API key settings</h2>
        <?php

          // Check if status is 1 which means a successful options save just happened
          if(isset($_GET['status']) && $_GET['status'] == 1): ?>

            <div class="notice notice-success inline">
              <p>Options Saved!</p>
            </div>

          <?php endif;

        ?>
        <form action="<?php echo esc_url( admin_url('admin-post.php') ); ?>" method="POST">

            <h3>Your API Key</h3>

            <!-- The nonce field is a security feature to avoid submissions from outside WP admin -->
            <?php wp_nonce_field( 'fsdapikey_api_options_verify'); ?>

            <input type="password" name="our_api_key" placeholder="Enter API Key" value="<?php echo $api_key ? esc_attr( $api_key ) : '' ; ?>">
            <input type="hidden" name="action" value="fsdapikey_external_api">
            <input type="submit" name="submit" id="submit" class="update-button button button-primary" value="Update API Key"  />
        </form>
    </div>
    <?php
}
Handle saving our settings
Now we have to actually handle the submissions. To do this, we’ll use a dynamic hook that is named based on the value you gave your action input. In this case “fsdapikey_external_api”.
add_action( 'admin_post_fsdapikey_external_api', 'fsdapikey_submit_api_key' );Great, we’re ready to build the handler for our settings page form submission.
In this function we need to do a couple security checks and then we can actually save the data to the database:
function fsdapikey_submit_api_key() {

    // Make sure user actually has the capability to edit the options
    if(!current_user_can( 'edit_theme_options' )){
      wp_die("You do not have permission to view this page.");
    }

    // pass in the nonce ID from our form's nonce field - if the nonce fails this will kill script
    check_admin_referer( 'fsdapikey_api_options_verify');


    if (isset($_POST['our_api_key'])) {


        $api_key = sanitize_text_field( $_POST['our_api_key'] );

        $api_exists = get_option('our_api_key');

        if (!empty($api_key) && !empty($api_exists)) {
            // Update
            update_option('our_api_key', $api_key);
        } else {
            // Add option on first save
            add_option('our_api_key', $api_key);
        }
    }
    // Redirect to same page with status=1 to show our options updated banner
    wp_redirect($_SERVER['HTTP_REFERER'] . '&status=1');
}
but wait!
This will save the API key as plain text. We want to encrypt it!
Encrypting our API key
No problem, we’ll use a slightly modified version of the encryption tool used by the WordPress Google Site Kit plugin. This is written as a PHP class, so if you are not used to object oriented PHP it may look a bit strange, but let’s go through how to use it:
/**
 * Class responsible for encrypting and decrypting data.
 */
class FSD_Data_Encryption {

	/**
	 * Key to use for encryption.
	 *
	 * @since 1.0.0
	 * @var string
	 */
	private $key;

	/**
	 * Salt to use for encryption.
	 *
	 * @since 1.0.0
	 * @var string
	 */
	private $salt;

	/**
	 * Constructor.
	 *
	 * @since 1.0.0
	 */
	public function __construct() {
		$this->key  = $this->get_default_key();
		$this->salt = $this->get_default_salt();
	}

	/**
	 * Encrypts a value.
	 *
	 * If a user-based key is set, that key is used. Otherwise the default key is used.
	 *
	 * @since 1.0.0
	 *
	 * @param string $value Value to encrypt.
	 * @return string|bool Encrypted value, or false on failure.
	 */
	public function encrypt( $value ) {
		if ( ! extension_loaded( 'openssl' ) ) {
			return $value;
		}

		$method = 'aes-256-ctr';
		$ivlen  = openssl_cipher_iv_length( $method );
		$iv     = openssl_random_pseudo_bytes( $ivlen );

		$raw_value = openssl_encrypt( $value . $this->salt, $method, $this->key, 0, $iv );
		if ( ! $raw_value ) {
			return false;
		}

		return base64_encode( $iv . $raw_value ); // phpcs:ignore WordPress.PHP.DiscouragedPHPFunctions.obfuscation_base64_encode
	}

	/**
	 * Decrypts a value.
	 *
	 * If a user-based key is set, that key is used. Otherwise the default key is used.
	 *
	 * @since 1.0.0
	 *
	 * @param string $raw_value Value to decrypt.
	 * @return string|bool Decrypted value, or false on failure.
	 */
	public function decrypt( $raw_value ) {
		if ( ! extension_loaded( 'openssl' ) ) {
			return $raw_value;
		}

		$raw_value = base64_decode( $raw_value, true ); // phpcs:ignore WordPress.PHP.DiscouragedPHPFunctions.obfuscation_base64_decode

		$method = 'aes-256-ctr';
		$ivlen  = openssl_cipher_iv_length( $method );
		$iv     = substr( $raw_value, 0, $ivlen );

		$raw_value = substr( $raw_value, $ivlen );

		$value = openssl_decrypt( $raw_value, $method, $this->key, 0, $iv );
		if ( ! $value || substr( $value, - strlen( $this->salt ) ) !== $this->salt ) {
			return false;
		}

		return substr( $value, 0, - strlen( $this->salt ) );
	}

	/**
	 * Gets the default encryption key to use.
	 *
	 * @since 1.0.0
	 *
	 * @return string Default (not user-based) encryption key.
	 */
	private function get_default_key() {
		if ( defined( 'LOGGED_IN_KEY' ) && '' !== LOGGED_IN_KEY ) {
			return LOGGED_IN_KEY;
		}

		// If this is reached, you're either not on a live site or have a serious security issue.
		return 'this-is-a-fallback-key-but-not-secure';
	}

	/**
	 * Gets the default encryption salt to use.
	 *
	 * @since 1.0.0
	 *
	 * @return string Encryption salt.
	 */
	private function get_default_salt() {
		if ( defined( 'LOGGED_IN_SALT' ) && '' !== LOGGED_IN_SALT ) {
			return LOGGED_IN_SALT;
		}

		// If this is reached, you're either not on a live site or have a serious security issue.
		return 'this-is-a-fallback-salt-but-not-secure';
	}
}
This class gives us access to an encrypt and decrypt method. The process that these functions use is a bit beyond the scope of this write up, but you may notice the are referencing some security constants (called “keys” and “salts”).
You can read more about what “salts” are and how they enhance encryption and hashing here.
For our purposes it’s enough to know that we can rely on the ‘LOGGED_IN_SALT’ constant existing. If it is not defined, you have a serious security problem with your WordPress install.
We’ll need to update our form submission handler now to use this and encrypt the key prior to storing:
// Rest of function...
  if (isset($_POST['our_api_key'])) {

        $data_encryption = new FSD_Data_Encryption();
        $submitted_api_key = sanitize_text_field( $_POST['our_api_key'] );
        $api_key = $data_encryption->encrypt($submitted_api_key);
// Rest of function...
Finally, we also need to update our function that renders the settings page. We need to decrypt the key when it fetches the current value from the database to populate the input field. Otherwise if you saved twice it would double encrypt and no longer work.
function fsdapikey_add_api_keys_callback() { ?>

    <?php
      $data_encryption = new FSD_Data_Encryption();
      $encrypted_api_key = get_option('our_api_key');

      if($encrypted_api_key){
        $api_key = $data_encryption->decrypt($encrypted_api_key);
      }
    // Rest of function ...
    ?>
At this point you should have a fully functioning settings page that encrypts and saves your key to the database!
Part 2: Create the custom endpoint
Next, let’s create a custom endpoint that we’ll hit from the front end to request data from the API.
add_action('rest_api_init', function () {
  register_rest_route( 'fsd/v1', '/fetch-external-api', array(
      'methods' => 'POST',
      'callback' => 'fsdapikey_fetch_external_api_data',
      'permission_callback' => function(){
        return current_user_can( 'edit_posts' );
      }
  ));
});
You’ll notice above we used a permission callback of ‘edit posts’. This is a great choice if your API is only meant to be used within a block. An example would be hitting ChatGPT to generate content in the editor. This protects the endpoint from unauthorized users abusing it.
If instead you are building a MailChimp integration for instance – you may want the ability to fire off requests from unauthenticated users. In this case you can pass in:
'permission_callback' => '__return_true'When registering the endpoint we also provide a callback function we want to run when the endpoint is hit. Let’s define that function now.
function fsdapikey_fetch_external_api_data($req) {

  $example_value = $req["exampleValue"];

  $data_encryption = new FSD_Data_Encryption();
  $api_key = $data_encryption->decrypt(get_option( 'our_api_key' ));

  if(empty($api_key)){
    return new WP_Error( 'error', 'Please enter an API key in settings to use this feature', array( 'status' => 403 ) );
  }

  $curl = curl_init();

  curl_setopt_array($curl, [
    // URL for example purposes only, this request will fail as-is even if API key valid - replace with your own request
    CURLOPT_URL => "https://maps.googleapis.com/maps/api/place/findplacefromtext/json?key={$api_key}&option={$example_value}",
    CURLOPT_RETURNTRANSFER => true,
    CURLOPT_ENCODING => "",
    CURLOPT_MAXREDIRS => 10,
    CURLOPT_TIMEOUT => 30,
    CURLOPT_HTTP_VERSION => CURL_HTTP_VERSION_1_1,
    CURLOPT_CUSTOMREQUEST => "GET",
    CURLOPT_POSTFIELDS => "",
  ]);

  $response = curl_exec($curl);
  $err = curl_error($curl);

  curl_close($curl);

  if ($err) {

    return new WP_Error( 'error', 'Invalid Request', array( 'status' => 404 ) );

  } else {

    $res = new WP_REST_Response($response);
    $res->set_status(200);

    return $res;
  }
}
Chances are for most APIs you may need to send along some extra information in a POST request. For instance, the email of a user you are subscribing, or the prompt for ChatGPT. We can pull variables from our request body in this handler function and then forward them along to the API.
We then can grab our API key from the options table and decrypt it. We’ll send all this info along to the external API.
Finally, we just send back whatever we get from the API to our client side script. We can also send back an error if the external API call fails for any reason.
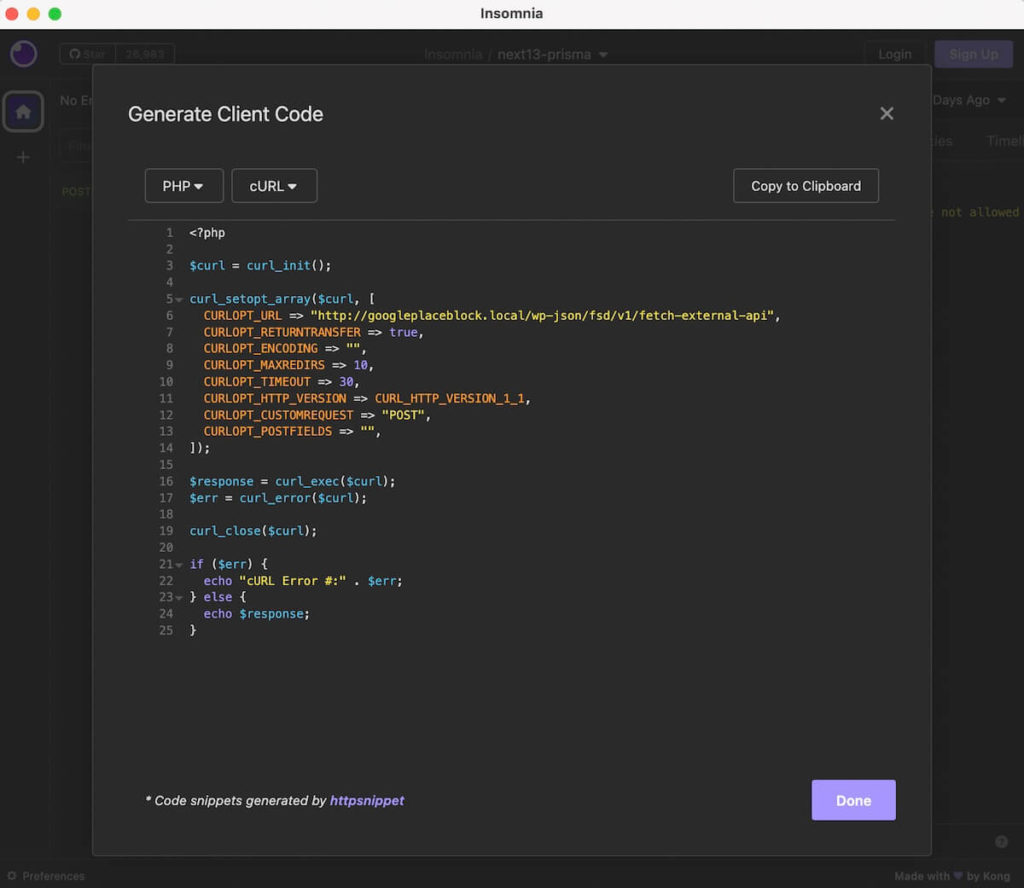
PHP curl is a bit of a pain to write out if you are used to using axios or fetch. My recommendation is to use a tool like Insomnia to prototype your request. This way you can just use the “copy code” function rather than type all the curl options out manually.
That’s it! Now we have our data from the external API in our client side script safely, without ever exposing our key. Plus, we went the extra mile and made it user-editable and encrypted within the database.
If you ran into any issues, feel free to grab the finished project for reference. You can also use this as a starting point any time you need to reference external APIs in a plugin.
Wrap up
This gives you a full boilerplate setup for accessing protected APIs. To actually put this to use on the client side your script will end up looking something like this:
          async function useExternalApi(){
            const res = await fetch("<?php echo home_url( ); ?>/wp-json/fsd/v1/fetch-external-api", {
              method: "POST",
              headers: {
                // The X-WP-Nonce is required to authenticate if you used a permission callback for your endpoint other than __return_true
                "X-WP-Nonce": "<?php echo wp_create_nonce( 'wp_rest' ) ?>",
                "Content-Type": "application/json"
              },
              body: JSON.stringify({
                exampleValue: "example"
              })
            });
            const data = await res.json()
            console.log(data)
            // Do something with the data ...
          }
You can omit the X-WP-Nonce header if you are using the __return_true permission callback for your endpoint. If you have a permission callback, you may find yourself needing to hit the endpoint from a separate javascript file instead of an inline script tag. In this case, you will need to use the WordPress provided localize script function to pass the nonce from the server to your javascript.
Hopefully this helps the next time you are trying to hook into a protected service and need a secret key. I plan to add a couple posts that show how to apply this setup in the coming weeks as well. If you are interested in seeing this in action consider signing up for my newsletter. Don’t worry, it’s only once a month!
Leave a Reply