The Gutenberg editor in WordPress is designed for composing content quickly, and once you are used to it I think it does that job very well.
For those just starting out though, opening up the “add block” panel can be overwhelming with the amount of choices, especially if there are a bunch of custom blocks an agency developed to choose from as well.
In this post we’ll go through a couple steps to optimize your editor experience for yourself, and especially for clients when developing custom themes.
Allow/Disallow
Gutenberg comes with two options for controlling blocks displayed within the editor, but they are managed a bit differently.
Option 1 – PHP Allow list
Allow listing explicitly specifics what blocks are allowed so you can choose just a subset to display. You can specify using a standard WordPress-style php function and have access to the post variable which allows you to check things like post type and conditionally allow different sets of blocks. This is the simplest method, but I would argue not the best.
function wpdocs_allowed_post_type_blocks( $allowed_block_types, $editor_context ) {
	if ( 'sponsors' === $editor_context->post->post_type ) {
		return array(
			'core/paragraph',
		);
	}

	if ( 'news' === $editor_context->post->post_type ) {
		return array(
			'core/paragraph',
			'core/list',
			'core/image',
			'core/buttons',
			'core/quote',
		);
	}

	if ( 'faqs' === $editor_context->post->post_type ) {
		return array(
			'core/paragraph',
			'core/list',
			'core/image',
			'core/buttons',
		);
	}

	return $blocks;
}

add_filter( 'allowed_block_types_all', 'wpdocs_allowed_post_type_blocks', 10, 2 );
I’ve found most agency made themes use this approach, but I mentioned this is not the best way to manage blocks for a couple reasons:
- As Gutenberg develops blocks can change handle and suddenly a block used all across the site may disappear from the editor panel.
- As Gutenberg adds more blocks in the future, all legacy themes will have to be updated to support them.
- Any time you add a custom block, you must also remember to add it to the allow list for it to show up for editors.
Option 2 – Javascript Unregister
This approach allows for the opposite logic. You can filter through blocks and remove ones you don’t want.
But this approach offers much more as well. In javascript, you have access to all the block attributes and can filter by category or variant, and have extremely granular control over blocks with the ability to choose whether to allow by default and selectively unregister or the other way around!
That said, it is just a little bit more complex to set up:
First, you have to register an editor script in the functions.php file or an include.
function custom_gutenberg_scripts() {

    wp_enqueue_script(
        'custom-editor',
        get_stylesheet_directory_uri() . '/src/js/editor.js',
        array( 'wp-blocks', 'wp-dom' ),
        filemtime( get_stylesheet_directory_uri() . '/src/js/editor.js' ),
        true
    );
}
add_action( 'enqueue_block_editor_assets', 'custom_gutenberg_scripts' );
If you want to do filtering by post type, you will also need to pass the post information into this script, which can be done with WordPress’ localize script function (here we are passing both the post type and post ID).
function custom_gutenberg_scripts() {

    wp_enqueue_script(
        'custom-editor',
        get_stylesheet_directory_uri() . '/src/js/editor.js',
        array( 'wp-blocks', 'wp-dom' ),
        filemtime( get_stylesheet_directory_uri() . '/src/js/editor.js' ),
        true
    );

    // Add custom data as a variable in JS
    wp_localize_script( 'custom-editor', 'postData',
        array(
            'postType' => get_post_type( get_the_id() ),
            'postId' => get_the_id(),
        )
    );
}
add_action( 'enqueue_block_editor_assets', 'custom_gutenberg_scripts' );
Now, you can hook into the block registration within your editor.js file and set up switch statements or conditionals to remove blocks.
Below is an example with several different types of logic for different post types that you can grab from for your own use.
wp.domReady(function () {
    /**
    * Manage Block Types By Post Type
    */


    // FILTER BLOCKS FOR PAGES
    if(postData.postType == 'page'){
        wp.blocks.getBlockTypes().forEach(function(block){

            // UNCOMMENT TO CHECK BLOCK DATA IN BROWSER
            // console.log(block)

            // ALLOW LIST BY CATEGORY
            if(block.category == 'custom') return

            if(block.category == 'text') return

            if(block.category == 'media') return

            // REMOVE VARIATIONS
            if(block.name === 'core/embed'){
                block.variations.forEach(variant => {
                    wp.blocks.unregisterBlockVariation( block.name, variant.name );
                })
                return
            }

            // ALLOW BY NAME
            if(block.name == 'core/columns'
              || block.name == 'core/separator'
              || block.name == 'core/spacer' ) return

            // Unregister everything that does not match
            wp.blocks.unregisterBlockType(block.name);
        })
    }


    // DEFINE THE BLOCKS WE WANT ON POSTS
    else if(postData.postType == 'post'){
        wp.blocks.getBlockTypes().forEach(function(block){

            // Unregister all blocks not in text category
            if(block.category !== 'text'){
              wp.blocks.unregisterBlockType(block.name);
            }

        })
    }

    // SAFE DEFAULTS FOR NEW POST TYPES

    else {

        wp.blocks.getBlockTypes().forEach(function(block){

            // Just selectively unregister blocks we don't want - leave everything else alone
            if(block.name == 'core/columns'){
             wp.blocks.unregisterBlockType(block.name);
            }


        })
    }
});
You might be wondering about how to figure out the block handle, category handle, etc. There are many blog posts that attempt to list these out, but inevitably they go out of date as Gutenberg evolves.
Instead, I recommend you add a console.log in this script and just log out every block. Load the editor and look in the browser inspector and you can examine all the data associated with each block the editor enqueues and set up your filtering based on this.
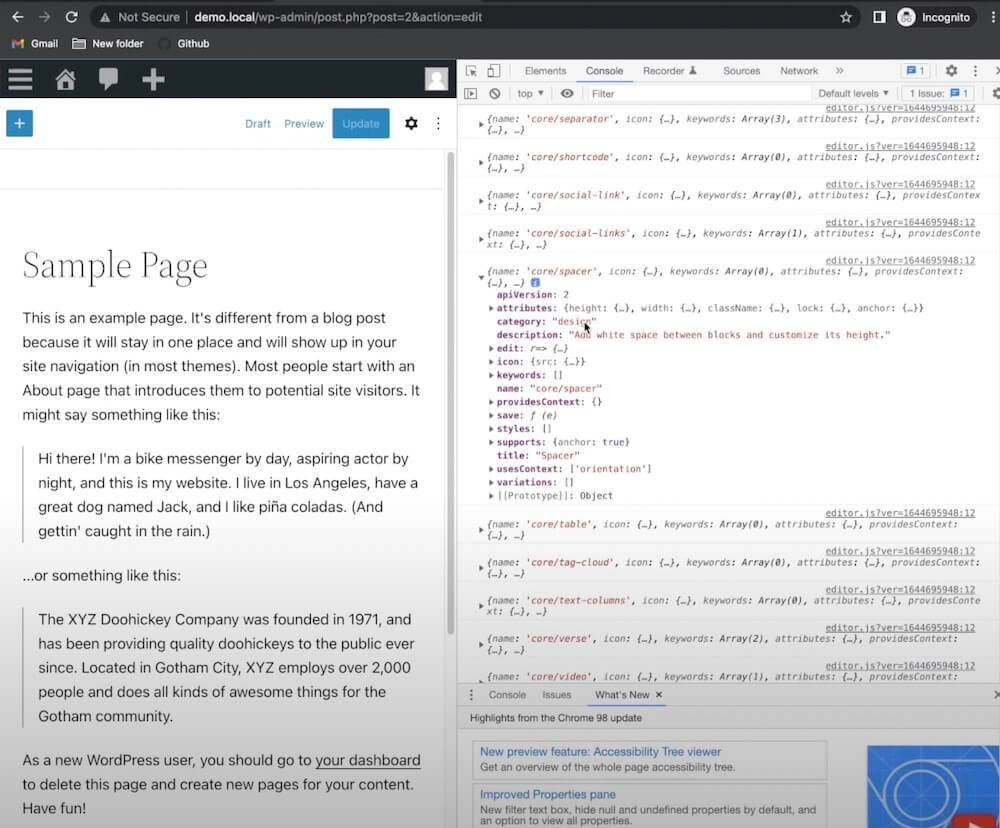
Logging like this is exactly how I figured out the structure of the embed block variations you see getting unregistered in the example code above.
You’ll notice a wide variety of black data available to you in the console – you could even do something like unregister blocks based on a certain block support they have!
Block Organization
Once you’ve tamed the core blocks in a way that makes sense, the next step is organizing custom blocks.
I see a lot of agency-developed themes, where all custom blocks share the same icon, are registered in the “layout” category, and have no block preview.
Obviously this is not a great experience, so let’s walk through some steps to improve this.
Firstly, just use the dashicons reference to pick an icon that roughly approximates the function of the block. That’s an easy win.
Custom Category
Next, it is very simple to register custom block categories. Depending on how many custom blocks are being built you may be able to just get away with a single one like “Custom Components” or even better use the site brand name like “<brand> Components”.
// ADD BLOCK CATEGORIESfunction custom_block_category( $categories, $post ) {
    return array_push($categories, array(
                'slug' => 'custom',
                'title' => __( 'Custom Blocks', 'textdomain' ),
            ));
}
add_filter( 'block_categories_all', 'custom_block_category', 10, 2);
If you have dozens of custom blocks, it might be better to break this into “Custom – CTAs”, “Custom – Banners”, etc. Though if you are registering dozens of custom blocks, it may be worth reconsidering if you can take a more atomic approach with less blocks and more patterns.
Category order
By default your custom category will show up at the bottom of the add block pane. Again, I see many themes where this is the case, but it’s extremely easy to pop it up to the top instead, which in most cases is much better for the content editors since most of the time they will be reaching for bespoke brand blocks when building landing pages.
All you need to do is use array_merge and put the custom categories first:
// ADD BLOCK CATEGORIES
function custom_block_category( $categories, $post ) {
    return array_merge(

        array(
            array(
                'slug' => 'custom',
                'title' => __( 'Custom Blocks', 'textdomain' ),
            ),
        ),
        $categories
    );
}
add_filter( 'block_categories_all', 'custom_block_category', 10, 2);
Block Previews
There are a couple ways to handle block previews, and the best one to choose largely depends on the block in question, but below are a few options for both native blocks and blocks built with ACF:
Make use of the “example” key and add some default content that will be rendered in the preview pane:
{
    "$schema": "https://schemas.wp.org/trunk/block.json",
    "apiVersion": 2,
    "name": "my-plugin/notice",
    "title": "Notice",
    "category": "text",
    "parent": [ "core/group" ],
    "icon": "star",
    "description": "Shows warning, error or success notices…",
    "attributes": {
        "message": {
            "type": "string",
            "source": "html",
            "selector": ".message"
        }
    },
    // This gets inputted for the preview
    "example": {
        "attributes": {
            "message": "This is a notice!"
        }
    },
    "editorScript": "file:./index.js",
    "script": "file:./script.js",
    "editorStyle": "file:./index.css",
    "style": [ "file:./style.css", "example-shared-style" ],
    "render": "file:./render.php"
}
If this renders strangely because of more complex logic in the block, it may be easier to just display a photo of what the final block should look like on the frontend.
Make sure these photos are small (400px wide or less) and minified, because this adds extra weight in the editor which is generally not a good thing, but in this case may be worth it for the improved experience.
You can do this by setting up the “example” key like so:
{
    "$schema": "https://schemas.wp.org/trunk/block.json",
    "apiVersion": 2,
    "name": "my-plugin/notice",
    "title": "Notice",
    "category": "text",
    "parent": [ "core/group" ],
    "icon": "star",
    "description": "Shows warning, error or success notices…",
    "attributes": {
        "message": {
            "type": "string",
            "source": "html",
            "selector": ".message"
        }
    },
    // This gets inputted for the preview
    "example": {
        "attributes": {
            "is_preview_mode": true,
            "preview_image_url": "/wp-content/uploads/example-image.jpg"
        }
    },
    "editorScript": "file:./index.js",
    "script": "file:./script.js",
    "editorStyle": "file:./index.css",
    "style": [ "file:./style.css", "example-shared-style" ],
    "render": "file:./render.php"
}
NOTE: This shows a relative url, but you should really use localize script to pass the absolute url from php using get_stylesheet_directory_uri() in case your install is not at the root web directory
Then in the render template simply have a conditional that checks if Gutenberg should be displaying the example (because it is previewing the block) and if so renders just a photo. Otherwise it falls back the normal block output.
if(is_preview_mode === true){
  return <img src={preview_image_url} />
}

// ... Rest of block logic
Wrapping up
By using this approach your block inserter pane will be a much better experience for content editors who will be able to grab the blocks they need easily, and not be distracted with choice paralysis, or lost looking for a specific block floating in a random category.
There is a lot more you can do to streamline content creation however, and I think the future of agency theme creation is block patterns with content-locking (available in WP 6.1).
If you’re interested in how to optimize the editor experience further with patterns and more, consider signing up for my once-monthly newsletter, as I have a lot of content around this planned, especially surrounding the 6.1 WordPress release.

Leave a Reply