Earlier this week ACF announced version 6.0 with a refreshed UI and a new way to register custom ACF blocks using the block.json file.
This mirrors how native Gutenberg blocks are registered an opens the door to use the powerful @wordpress/scripts package to handle block scripts and styles as well.
Let’s walk through a setup for a custom theme that supports custom ACF blocks and custom native Gutenberg blocks side-by-side using the new ACF block.json structure. Our theme also compiles everything through @wordpress/scripts with live reload!
This is an excellent setup for agencies/freelancers developing for clients where you want blocks to be integrated into the theme as part of the final package. Of course, if you prefer you could handle blocks in a plugin as well, but this will be a smoother workflow for most.
Barebones theme structure
We’ll start with a barebones theme with just a style.css and functions.php file.
You can add a src/ directory with an index.js and index.scss file (you can also use postCSS if you prefer with no difference in setup, I’ll use SCSS for this though).
You’ll import the SCSS file into the index.js file, along with any other javascript modules you create, as this will be the entry point for your theme assets.

Blocks Folder and Block.json
Now create a blocks/ directory at the root level. This is where you will define all your custom blocks. You can now have ACF blocks and native Gutenberg blocks side-by-side in this directory!
Let’s add the structure for a test block:
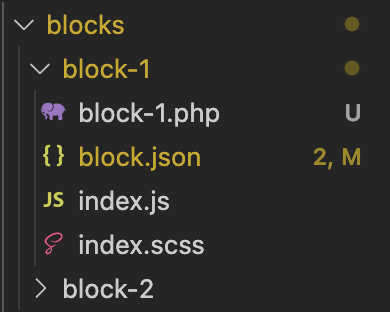
We have 4 files. Our styles, scripts, a render template, and the block.json file. Just like in our src/ folder, the index.scss file is imported at the top of the index.js file to make sure webpack can discover and process it.
Let’s take a closer look at the ACF block.json file:
{
    "$schema": "https://schemas.wp.org/trunk/block.json",
    "name": "acf/testblock",
    "title": "Test Block",
    "description": "A test block for new compilation.",
    "style": "file:./index.css",
    "script": "file:./index.js",
    "category": "design",
    "icon": "list-view",
    "keywords": ["testimonial", "quote"],
    "apiVersion": 2,
    "acf": {
        "mode": "edit",
        "renderTemplate": "block1.php"
    },
    "align": "full",
    "supports": {
        "align": true,
        "anchor": true
    }
}
This file holds all the block info and points with relative paths to the associated script and style assets. In addition, it specifies the render template to be used, again with a relative path syntax.
We won’t actually register the block from here though, we are going to run a build process and then point to our build folder where all our final assets will show up.
Compilation of our blocks and theme assets
At this point lets install our packages for compiliation. First lets get our package.json file:
npm init -yThen we’ll need three packages to get everything up and running (not bad for everything going on under the hood!)
npm install --save-dev @wordpress/scripts browser-sync npm-run-allAt this point we need to open up our package.json file and define our scripts. This is where most of the work is!
  "scripts": {
    "start": "wp-scripts start src/index.js --output-path=build/theme",
    "build": "wp-scripts build src/index.js --output-path=build/theme",
    "blocks-start": "wp-scripts start --webpack-src-dir=blocks --webpack-copy-php --output-path=build/blocks",
    "blocks-build": "wp-scripts build --webpack-src-dir=blocks --webpack-copy-php --output-path=build/blocks"
  },
To keep our main theme assets and block compilation from interfering with each other we define start and build scripts for each specifying separate output directories in a build folder.
Then we add a browser sync command that you can modify to your liking:
"sync": "browser-sync start --proxy \"your-dev-url.local\" --reload-delay 200 --files=[\"**/*.css\", \"wp-content/themes/**/*.php\"]"Finally we put it together with a develop script that runs everything in watch mode and fires up our browser sync as well.
"develop": "npm-run-all --parallel start blocks-start sync"@wordpress/scripts is smart so when we run start it will create source maps, and when we run build it will ditch the source maps and minify everything. No further config needed!
Go ahead and run the develop command:
npm run develop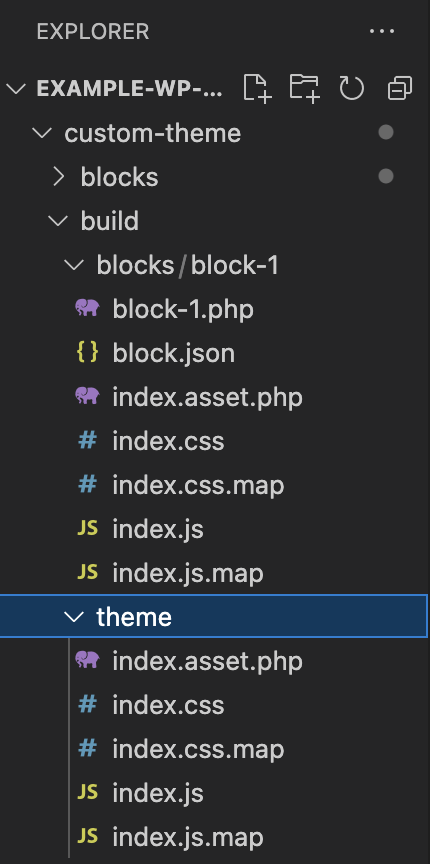
Awesome. You should see a build directory with a theme and block subdirectory with all our processed css and javascript files. In addition, it outputs a asset.php file for version and dependency tracking.
Enjoying the read?
Join 500+ developers and learn modern WordPress, JAMStack, and javascript frameworks with a monthly development newsletter geared towards agencies and freelancers.
Finishing Up
Now the whole dev workflow is in place. The last step is just to add a one-liner to our functions.php file that tells WordPress about where to look for our blocks:
// Register ACF blocks via block.json
function register_acf_blocks() {
    register_block_type( __DIR__ . '/build/blocks/block-1' );
}
add_action( 'init', 'register_acf_blocks', 5 );
You might be wondering if we need to enqueue the block css/js. We don’t! WordPress sees the style and script keys in the block.json file and handles all this for us.
Unfortunately, it does not auto-import our theme assets so we need to add an enqueue function for those:
function custom_scripts_and_styles() {
  $ASSET_INFO = include get_stylesheet_directory() . '/build/theme/index.asset.php';
  wp_enqueue_style( 'custom-style', get_stylesheet_directory_uri() . '/build/theme/index.css', array(), $ASSET_INFO['version'] );
  wp_enqueue_script( 'custom-script', get_stylesheet_directory_uri() . '/build/theme/index.js', $ASSET_INFO['dependencies'], $ASSET_INFO['version'] );
}
add_action( 'wp_enqueue_scripts', 'custom_scripts_and_styles' );
You can see we are using that nifty index.asset.php file for our versioning and dependencies.
Done!
At this point you are ready to start building custom ACF blocks using ACF block.json files with this workflow. You can fire up WordPress activate the theme, install ACF 6.0, and go ahead and start building blocks.
I find this setup makes it super fast to whip out a collection of branded blocks for client websites especially since you can do all the styling with live-reload in the browser.
To go even further I would add a patterns directory for custom patterns and make a custom Theme.json file to make sure all the core blocks match our site branding.
If you want to go even further, you could convert this to a block theme and make use of the Full Site Editing in Gutenberg. I have several posts planned going in depth into block theme development, so if you are interested in learning more about this consider signing up for my once-a-month newsletter where I share the best resources/tools for modern WordPress development.
Leave a Reply