A common pattern in WordPress development, especially in agency settings, is creating a custom post type that is almost entirely structured meta fields, rather than long-form editor content.
This could be “properties” for a real estate site, “classes” for a gym, “books” for a publisher, etc. The idea is that attributes like ISBN, square footage, price, etc. are all registered as custom fields. Creating a new post for these items feels more akin to filling out a form than building a web page.
A traditional approach to this is disabling the Gutenberg editor, and creating ACF (or metabox) fields for all the fields required. This creates the “form-style” editor experience for content managers and allows lots of advanced filtering by these meta attributes.
In this write up, we’ll try to recreate this kind of experience, using only native WordPress functionality, while keeping the Gutenberg editor enabled. This way editors could still compose long-form content associated with the post, while the meta fields stay structured and controlled.
For this example, we’ll use a “property” custom post type for a fictional real estate related client website. We’ll add meta fields for the number of bedrooms/bathrooms and square footage, so that users could theoretically sort and filter by these attributes.
Next, we’ll create a block that hooks into the post meta allowing editors to update meta straight from the main post editor screen.
Finally, we’ll do some editor curation to make this experience more fluid. The meta block will be part of the template for the property post type and locked to prevent removal. It will be hidden from the inserter everywhere else, and only one instance of it will be allowed per property listing.
All of this functionality will be contained in a standalone plugin, but you could just as easily build this into a theme as well.
Let’s get started!
Setting up our plugin / custom block
To streamline the plugin creation process we’ll use the WordPress Scripts package. We can then make some modifications to suit our own needs.
Run the following command to bootstrap a custom dynamic block plugin:
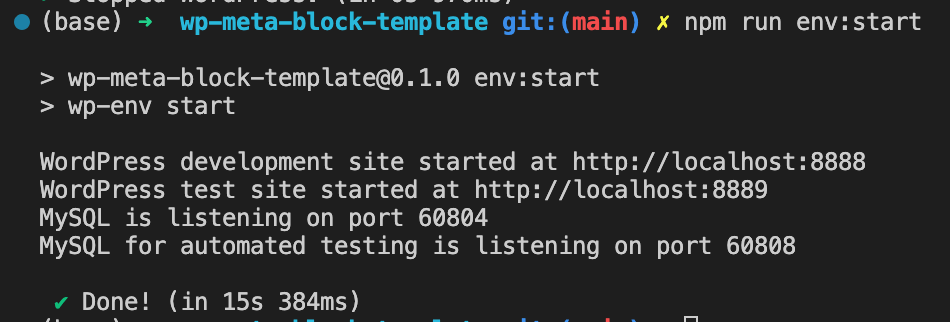
npx @wordpress/create-block@latest --variant dynamicNext, we’ll set up the @wordpress/env package to make local development easier. You can also just move this plugin folder into a sample site using your local development platform of choice – or even use WordPress playground!
Note: if you want to follow along with the @wordpress/env route, you will need docker installed on your system, as this is how the package runs.
Go ahead and and install the package:
npm i -D @wordpress/envNow create a .wp-env.json file and add the following entry. This just tells WordPress to include the current directory as a plugin on the site leaving all other configuration default.
{
	"core": "WordPress/WordPress",
	"plugins": [
		"."
	]
}
Finally, I like to add two scripts to my package.json to make things easier for starting and stopping the site.
		"env:start": "wp-env start",
		"env:stop": "wp-env stop"
Go ahead and run the start command npm run env:start and visit the local development url.
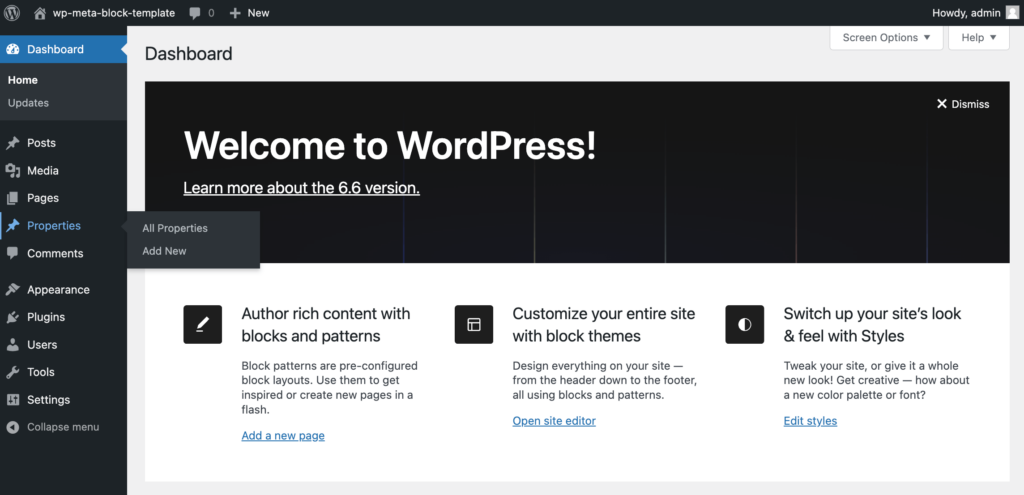
You should be able to sign in with the default credentials (“admin” / “password”) and see your plugin in the dashboard.
Great, we are ready for local development.
Registering the property post type and adding custom meta
We’ll get back to creating our custom block. For now, let’s set up the custom post type with a few meta fields.
Create an includes/ directory and add a file called register-post-type.php. You can copy in the following boilerplate for registration (this is straight from the WordPress documentation). The most important thing is you MUST add support for “custom fields”, so that we can attach meta to the post type.
<?php
/**
 * Register a property CPT
 */
function fsd_property_post_type(){
  $labels = array(
		'name'                  => _x( 'Properties', 'Post type general name', 'fsd' ),
		'singular_name'         => _x( 'Property', 'Post type singular name', 'fsd' ),
		'menu_name'             => _x( 'Properties', 'Admin Menu text', 'fsd' ),
		'name_admin_bar'        => _x( 'Property', 'Add New on Toolbar', 'fsd' ),
		'add_new'               => __( 'Add New', 'fsd' ),
		'add_new_item'          => __( 'Add New Property', 'fsd' ),
		'new_item'              => __( 'New Property', 'fsd' ),
		'edit_item'             => __( 'Edit Property', 'fsd' ),
		'view_item'             => __( 'View Property', 'fsd' ),
		'all_items'             => __( 'All Properties', 'fsd' ),
		'search_items'          => __( 'Search Properties', 'fsd' ),
		'parent_item_colon'     => __( 'Parent Properties:', 'fsd' ),
		'not_found'             => __( 'No Properties found.', 'fsd' ),
		'not_found_in_trash'    => __( 'No Properties found in Trash.', 'fsd' ),
		'featured_image'        => _x( 'Property Cover Image', 'Overrides the “Featured Image” phrase for this post type. Added in 4.3', 'fsd' ),
		'set_featured_image'    => _x( 'Set cover image', 'Overrides the “Set featured image” phrase for this post type. Added in 4.3', 'fsd' ),
		'remove_featured_image' => _x( 'Remove cover image', 'Overrides the “Remove featured image” phrase for this post type. Added in 4.3', 'fsd' ),
		'use_featured_image'    => _x( 'Use as cover image', 'Overrides the “Use as featured image” phrase for this post type. Added in 4.3', 'fsd' ),
		'archives'              => _x( 'Property archives', 'The post type archive label used in nav menus. Default “Post Archives”. Added in 4.4', 'fsd' ),
		'insert_into_item'      => _x( 'Insert into Property', 'Overrides the “Insert into post”/”Insert into page” phrase (used when inserting media into a post). Added in 4.4', 'fsd' ),
		'uploaded_to_this_item' => _x( 'Uploaded to this Property', 'Overrides the “Uploaded to this post”/”Uploaded to this page” phrase (used when viewing media attached to a post). Added in 4.4', 'fsd' ),
		'filter_items_list'     => _x( 'Filter Properties list', 'Screen reader text for the filter links heading on the post type listing screen. Default “Filter posts list”/”Filter pages list”. Added in 4.4', 'fsd' ),
		'items_list_navigation' => _x( 'Properties list navigation', 'Screen reader text for the pagination heading on the post type listing screen. Default “Posts list navigation”/”Pages list navigation”. Added in 4.4', 'fsd' ),
		'items_list'            => _x( 'Properties list', 'Screen reader text for the items list heading on the post type listing screen. Default “Posts list”/”Pages list”. Added in 4.4', 'fsd' ),
	);

	$args = array(
		'labels'             => $labels,
		'public'             => true,
		'publicly_queryable' => true,
		'show_ui'            => true,
		'show_in_menu'       => true,
		'show_in_rest'       => true,
		'query_var'          => true,
		'rewrite'            => array( 'slug' => 'properties', 'with_front' => false ),
		'capability_type'    => 'post',
		'has_archive'        => true,
		'hierarchical'       => false,
		'menu_position'      => 20,
		'supports'           => array( 'title', 'editor', 'author', 'thumbnail', 'excerpt', 'custom-fields'), // IMPORTANT - custom fields is required
    'description'        => __('A custom property post type', 'fsd'),

	);

	register_post_type( 'property', $args );
}

add_action( 'init', 'fsd_property_post_type' );
Perfect, let’s make sure to include this file at the bottom of our root plugin php file:
<?php

/**
 * Plugin Name:       WP Meta Block Template
 * Description:       Example of creating structured CPTs with a meta block
 * Requires at least: 6.1
 * Requires PHP:      7.0
 * Version:           0.1.0
 * Author:            FSD
 * License:           GPL-2.0-or-later
 * License URI:       https://www.gnu.org/licenses/gpl-2.0.html
 * Text Domain:       fsd
 *
 * @package CreateBlock
 */

if (!defined('ABSPATH')) {
	exit; // Exit if accessed directly.
}

/**
 * Registers the block using the metadata loaded from the `block.json` file.
 * Behind the scenes, it registers also all assets so they can be enqueued
 * through the block editor in the corresponding context.
 *
 * @see https://developer.wordpress.org/reference/functions/register_block_type/
 */
function fsd_register_meta_block()
{
	register_block_type(__DIR__ . '/build');
}
add_action('init', 'fsd_register_meta_block');

include_once(plugin_dir_path(__FILE__) . 'includes/register-post-type.php');
If you refresh the dashboard you should now see our custom post type showing up in the sidebar.
Adding meta fields
Now, lets add a few meta fields. I’d advise you take a look at this documentation page to see all the options and possiblities available to you with the register_meta() function.
For now, we can add the following beneath our post type registration code in the register-post-type.php file:
<?php
/**
 * Register a property CPT and attach meta
 */
function fsd_property_post_type(){

         // ... Rest of our registration function
	register_post_type( 'property', $args );

	register_post_meta(
		'property',
		'squareFootage',
		array(
			'show_in_rest' => true,
			'single'       => true,
			'type'         => 'integer',
		)
	);

	register_post_meta(
		'property',
		'bedrooms',
		array(
			'show_in_rest' => true,
			'single'       => true,
			'type'         => 'integer',
		)
	);

	register_post_meta(
		'property',
		'bathrooms',
		array(
			'show_in_rest' => true,
			'single'       => true,
			'type'         => 'number', // Half baths exist, so we want number, NOT integer here
		)
	);

	register_post_meta(
		'property',
		'price',
		array(
			'show_in_rest' => true,
			'single'       => true,
			'type'         => 'number',
		)
	);

}

add_action( 'init', 'fsd_property_post_type' );
The key point here is the meta field needs to be made available to the REST API for it to be editable in the block editor context. You should also add sanitization, but the implementation will vary depending on the type of data you want to store.
IMPORTANT: For a real plugin you definitely should prefix your meta (eg. fsd_price, fsd_bathrooms) to prevent conflicts with other plugins. For demo purposes, I am leaving it off just for readability.
Awesome. We are ready to move into creating a block that allows us to update this meta information from the editor.
Creating a block that hooks into post meta
If you are used to coding dynamic blocks, your first impulse might be to open the block.json file and start adding attributes. We won’t have any attributes though! The block doesn’t need to save any data itself, instead it will access the post meta directly.
Jump into your edit.js file and add the following code. I’ve added comments to make it clear what is happening under the hood:
import { useBlockProps } from '@wordpress/block-editor';

import { useSelect } from '@wordpress/data';
import { useEntityProp } from '@wordpress/core-data';

import './editor.scss';


export default function Edit() {

	// Attributes for the block wrapper
	const blockProps = useBlockProps()

	// Determine the curent post type in the editor context
	const currentPostType =  useSelect((select) => {
		return select('core/editor').getCurrentPostType()
	}, [])

	// Fetch the meta as an object and the setMeta function
	const [meta, setMeta] = useEntityProp('postType', currentPostType, 'meta');

	// Destructure all our individual properties from the meta for ease of use
	const {bedrooms, bathrooms, price, squareFootage} = meta

	return (
		<div { ...blockProps }></div>
	);
}
This code gives us access to all our post metadata, now we need a way to display and edit it. Let’s use some built in components from WordPress.
Add the following code in the return statement of your edit.js file. Don’t forget to import the components as well!
import { useBlockProps } from '@wordpress/block-editor';
import { useSelect } from '@wordpress/data';
import { useEntityProp } from '@wordpress/core-data';
// NEW IMPORTS
import { RangeControl, __experimentalInputControl as InputControl } from '@wordpress/components';
// Technically the input control is flagged experimental, but I've heard this will be stable quite soon - we're going to use it either way, but you could just create your own input component if you prefer
import './editor.scss';
export default function Edit() {
// ... Rest of our logic for pulling metadata
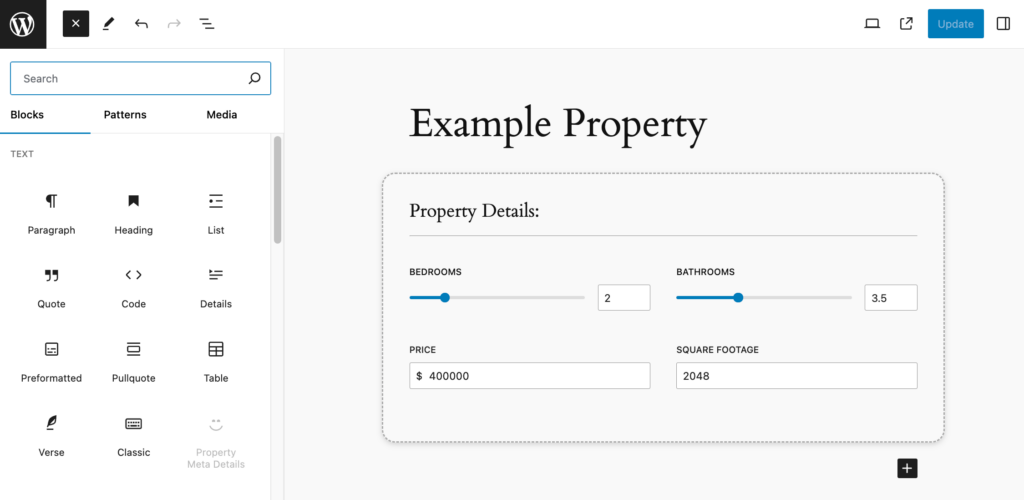
return (
<div { ...blockProps }>
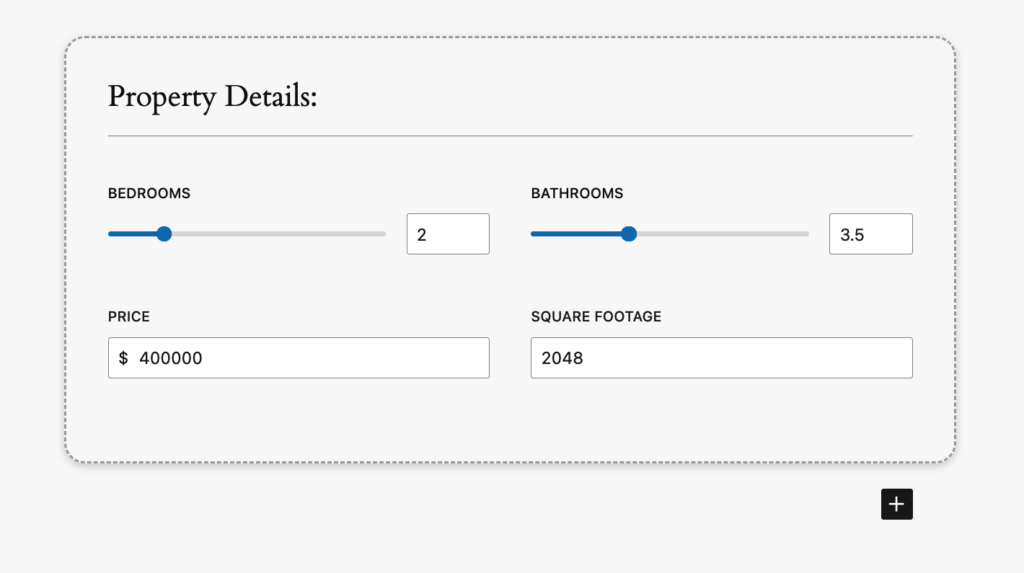
<h4>Property Details:</h4>
<hr />
<div className="fsd-property-meta-details__grid">
<RangeControl
label="Bedrooms"
value={ bedrooms }
onChange={ ( nextValue ) => updateMeta("bedrooms", nextValue) }
min={ 0 }
max={ 10 }
step={1}
/>
<RangeControl
label="Bathrooms"
value={ bathrooms }
onChange={ ( nextValue ) => updateMeta("bathrooms", nextValue) }
min={ 0 }
max={ 10 }
step={0.5} // Half baths
/>
<InputControl
prefix="$"
type="number"
label="Price"
value={ price }
onChange={ ( nextValue ) => updateMeta("price", nextValue) }
/>
<InputControl
type="number"
label="Square Footage"
value={ squareFootage }
onChange={ ( nextValue ) => updateMeta("squareFootage", nextValue) }
/>
</div>
</div>
);
}
We have two range sliders, one for bedrooms and one for bathrooms. I’ve made the bathrooms one step by 0.5 since many units measure “half-baths” as well.
We also have two number inputs for the price and square footage. Keep in my mind you can create your own custom react components as well. I like to show using built in WordPress components since it streamlines the process and gives you a native feeling experience.
Our components have the value hooked to our metadata, but you might notice the onChange is referencing an updateMeta function we haven’t defined yet. Add this code just above the return statement:
	// Flexible helper for setting a single meta value w/o mutating state
	const updateMeta = ( key, value ) => {
		setMeta( { ...meta, [key]: value } );
	};
This function is essentially a flexible helper for calling setMeta that takes care of destructuring the existing meta data of the post, so that we don’t mutate state, and don’t have to manually add ...meta every time.
This is all the logic we need, now you can add the following CSS to your editor.css file to add some basic styling / layout. I won’t go into detail here, it’s all pretty straightforward CSS:
/**
* The following styles get applied inside the editor only.
*/
.wp-block-fsd-property-meta-details {
display: block;
padding: 2rem;
border: 2px #aaa dashed;
border-radius: 16px;
h4 {
margin: 0 0 1rem 0;
padding: 0;
}
.fsd-property-meta-details__grid {
display: grid;
grid-template-columns: 1fr 1fr;
gap: 2rem;
margin-block: 2rem;
}
.fsd-property-meta-details__preview {
background: white;
border-radius: 8px;
box-shadow: 0px 4px 12px rgb(0,0,0,0.15);
padding: 2rem;
}
.components-input-control__prefix {
padding-left: 8px;
display: inline-block;
}
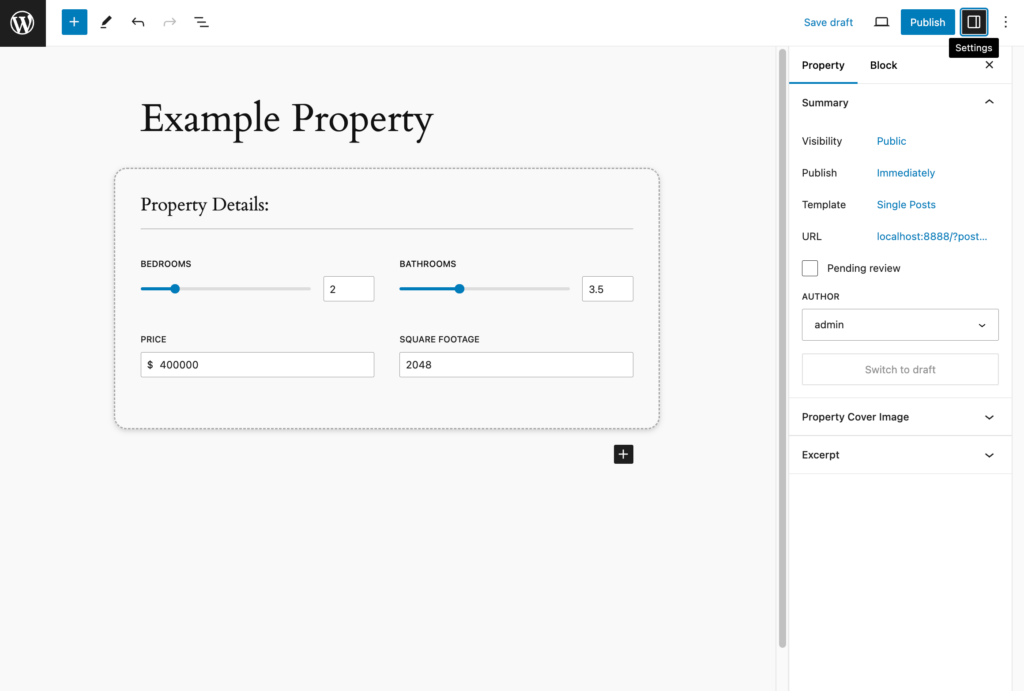
}At this point, you can load up a property in the editor and you should be able to add our block, update the meta properties of the post, and save. The values should persist!
Congratulations! You’ve finished the most complex part! Now we can just focus on improving the editor experience and rendering on the frontend.
Setting up our render template
This next step is entirely optional. Usually when making a dynamic block we would go into render.php and create our template that we want displayed on the front end using our block attributes.
Since this block only stores data in the post-meta, we could simply leave the render.php blank. Instead, we could handle displaying the meta through a custom post template. This would especially make sense if you are building this functionality in a hybrid theme.
For demo purposes, we’ll go ahead and create a render.php for this block. This way we can easily view our saved meta on the front end of our site, without needing to modify or create a custom template for this post type.
Here’s how we could hook into and display our meta in a toolbar style fashion with some SVG icons just for fun:
<?php
/**
 * @see https://github.com/WordPress/gutenberg/blob/trunk/docs/reference-guides/block-api/block-metadata.md#render
 */
?>

<?php /*
We could render some block output here, or leave blank and handle metadata in the template file - depends on the use case
*/

global $post;

?>

<div <?php echo get_block_wrapper_attributes(); ?>>
	<div>
		<svg width="24px" height="24px" viewBox="0 0 24 24" stroke-width="1.5" fill="none" xmlns="http://www.w3.org/2000/svg" color="#000000"><path d="M21 4V20C21 21.1046 20.1046 22 19 22H5C3.89543 22 3 21.1046 3 20V4C3 2.89543 3.89543 2 5 2H19C20.1046 2 21 2.89543 21 4Z" stroke="#000000" stroke-width="1.5" stroke-linecap="round" stroke-linejoin="round"></path><path d="M3 8L11 8L11 6" stroke="#000000" stroke-width="1.5" stroke-linecap="round" stroke-linejoin="round"></path><path d="M21 8L13 8L13 6" stroke="#000000" stroke-width="1.5" stroke-linecap="round" stroke-linejoin="round"></path></svg>
		<p><?php esc_html_e( get_post_meta( $post->ID, 'bedrooms', true ) ); ?> Bedrooms</p>
	</div>

	<div>
		<svg width="24px" height="24px" viewBox="0 0 24 24" stroke-width="1.5" fill="none" xmlns="http://www.w3.org/2000/svg" color="#000000"><path d="M21 13V16C21 18.2091 19.2091 20 17 20H7C4.79086 20 3 18.2091 3 16V13.6C3 13.2686 3.26863 13 3.6 13H21Z" stroke="#000000" stroke-width="1.5" stroke-linecap="round" stroke-linejoin="round"></path><path d="M16 20L17 22" stroke="#000000" stroke-width="1.5" stroke-linecap="round" stroke-linejoin="round"></path><path d="M8 20L7 22" stroke="#000000" stroke-width="1.5" stroke-linecap="round" stroke-linejoin="round"></path><path d="M21 13V7C21 4.79086 19.2091 3 17 3H12" stroke="#000000" stroke-width="1.5" stroke-linecap="round" stroke-linejoin="round"></path><path d="M15.4 8H8.60003C8.26865 8 8.00393 7.7317 8.04019 7.4023C8.18624 6.07539 8.86312 3 12 3C15.1369 3 15.8138 6.07539 15.9598 7.4023C15.9961 7.73169 15.7314 8 15.4 8Z" stroke="#000000" stroke-width="1.5" stroke-linecap="round" stroke-linejoin="round"></path></svg>
		<p><?php esc_html_e( get_post_meta( $post->ID, 'bathrooms', true ) ); ?> Bathrooms</p>
	</div>

	<div>
		<svg width="24px" height="24px" stroke-width="1.5" viewBox="0 0 24 24" fill="none" xmlns="http://www.w3.org/2000/svg" color="#000000"><path d="M12 22C17.5228 22 22 17.5228 22 12C22 6.47715 17.5228 2 12 2C6.47715 2 2 6.47715 2 12C2 17.5228 6.47715 22 12 22Z" stroke="#000000" stroke-width="1.5" stroke-linecap="round" stroke-linejoin="round"></path><path d="M15 8.5C14.315 7.81501 13.1087 7.33855 12 7.30872M9 15C9.64448 15.8593 10.8428 16.3494 12 16.391M12 7.30872C10.6809 7.27322 9.5 7.86998 9.5 9.50001C9.5 12.5 15 11 15 14C15 15.711 13.5362 16.4462 12 16.391M12 7.30872V5.5M12 16.391V18.5" stroke="#000000" stroke-width="1.5" stroke-linecap="round" stroke-linejoin="round"></path></svg>
		<p>$<?php esc_html_e( get_post_meta( $post->ID, 'price', true ) ); ?></p>
	</div>

	<div>
		<svg width="24px" height="24px" viewBox="0 0 24 24" stroke-width="1.5" fill="none" xmlns="http://www.w3.org/2000/svg" color="#000000"><path d="M3 21L3 3L9 3V15L21 15V21H3Z" stroke="#000000" stroke-width="1.5" stroke-linecap="round" stroke-linejoin="round"></path><path d="M13 19V21" stroke="#000000" stroke-width="1.5" stroke-linecap="round"></path><path d="M9 19V21" stroke="#000000" stroke-width="1.5" stroke-linecap="round"></path><path d="M3 7H5" stroke="#000000" stroke-width="1.5" stroke-linecap="round"></path><path d="M3 11H5" stroke="#000000" stroke-width="1.5" stroke-linecap="round"></path><path d="M3 15H5" stroke="#000000" stroke-width="1.5" stroke-linecap="round"></path><path d="M17 19V21" stroke="#000000" stroke-width="1.5" stroke-linecap="round"></path></svg>
		<p><?php esc_html_e( get_post_meta( $post->ID, 'squareFootage', true ) ); ?> SQ FT</p>
	</div>
</div>
We’ll also add some basic CSS for the front end in our style.css file:
/**
 * The following styles get applied both on the front of your site
 * and in the editor.
 */

.wp-block-fsd-property-meta-details {
  width: 100%;
  display: flex;
  flex-wrap: wrap;
  box-shadow: 0px 2px 6px rgb(0, 0, 0, 0.15);
  border-radius: 12px;
  padding: 1.5rem;
  gap: 2rem;

  & > div {
    display: flex;
    align-items: center;
    gap: 0.5rem;
  }
}
If you save some meta data for a post using our block and view on the front end, you should see our stats appearing like so:
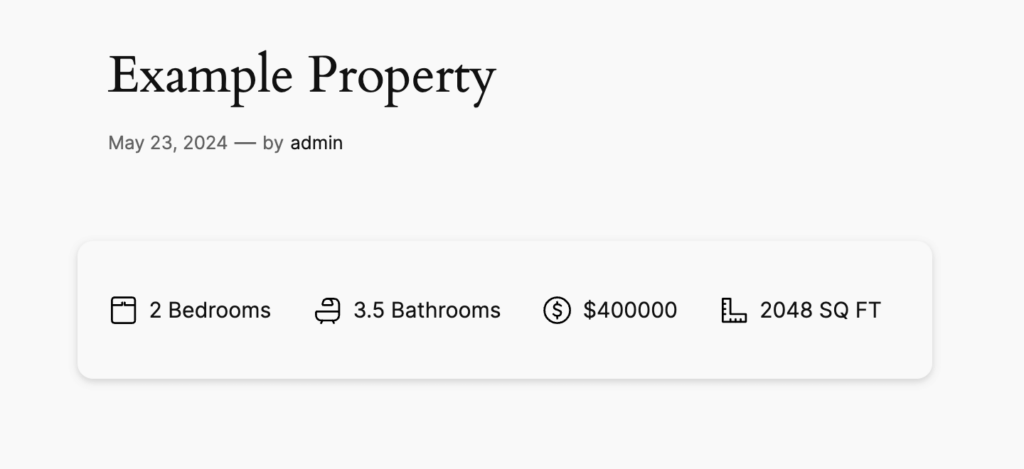
Of course, in reality we would likely add an image gallery and description as well, but the beauty of this approach is we still have full use of the block editor, so adding content like that is trivial. No need to add additional custom fields, unless you want to use them for sorting/filtering etc!
Polishing the editor experience
At this point the core functionality is all in place! Let’s work on making the editing experience as polished as we can.
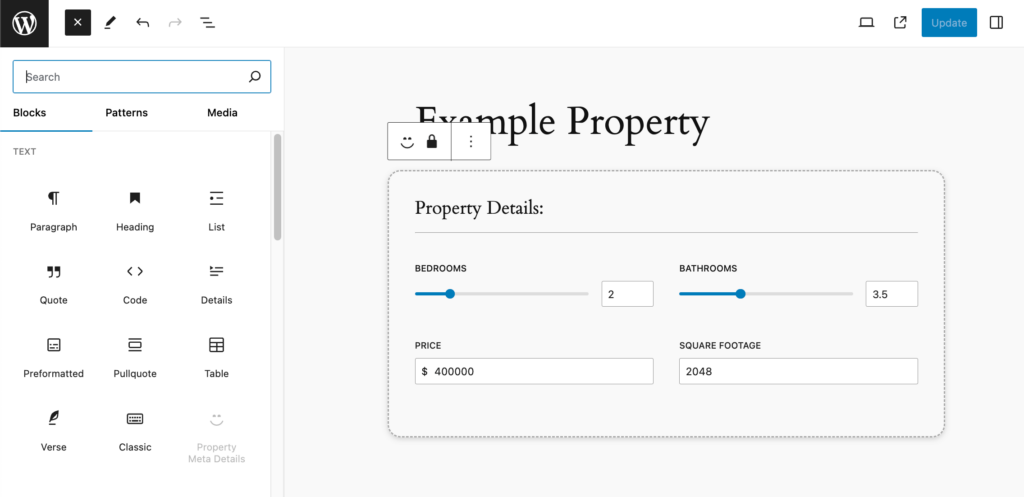
Limiting to one block per post
First off, it doesn’t make sense for multiple instances of this block to exist on a property. This would cause some weird behavior since the blocks would be sharing the same data source.
This is actually super easy to fix, we just add one line to the block.json file under “supports”:
	"supports": {
		"html": false,
		"multiple": false
	},
Now, once a block exists, the inserter will prevent adding a second by graying it out in the inserter.
Creating a block template for our post type
We don’t want to force our editors to know to add this block to a property. Instead let’s have this block already inserted by default.
We can do this by adding a template to our custom post type declaration:
/* Snippet shown - ... rest of function above */

$args = array(
		'labels'             => $labels,
		'public'             => true,
		'publicly_queryable' => true,
		'show_ui'            => true,
		'show_in_menu'       => true,
		'show_in_rest'       => true,
		'query_var'          => true,
		'rewrite'            => array( 'slug' => 'properties', 'with_front' => false ),
		'capability_type'    => 'post',
		'has_archive'        => true,
		'hierarchical'       => false,
		'menu_position'      => 20,
		'supports'           => array( 'title', 'editor', 'author', 'thumbnail', 'excerpt', 'custom-fields'),
    'description'        => __('A custom property post type', 'fsd'),
    'template' => array(
      array('fsd/property-meta-details', array(
        'lock' => array(
          'remove' => true,
        ),
      ))
    )
	);

	register_post_type( 'property', $args );

/* Snippet shown - ... Metadata registration below... */
We can also add a locking option here. I’ve chosen to prevent block removal, but allow moving it. Depending on your use-case, it may make sense to lock movement also. You could even create a pattern and lock everything with content-only editing.
One note: this is not a perfect solution. You can unlock the block in the editor and remove it, but for me this is not a huge deal. Deleting the block won’t delete the saved meta. If someone manages to accidentally unlock and delete, you can always just add again.
If you need it, content-only editing provides more protection since editors cannot unlock it. You can also remove the ability to lock/unlock blocks based on role/post type if you want more control.
I recommend reading the locking API documentation if you are curious about all the options available to you.
Hiding our block from other post types
The final detail is that it doesn’t make sense for our block to appear anywhere except on a property post type.
To do this, we will create a javascript file to hook into the editor and conditionally deregister our block. Unfortunately setting this up is a bit of a pain, but the javascript itself is quite simple.
Create a scripts directory in your plugin and add an editor.js file. We’ll want this to get processed by wordpress/scripts, so we have to add a webpack.config.js file to the root of our plugin directory and modify our entry points:
const defaultConfig = require( '@wordpress/scripts/config/webpack.config' );

module.exports = {
    ...defaultConfig,
    entry: {
      ...defaultConfig.entry(),
      editor: './scripts/editor.js'
    },
};
This uses the built in config for all our blocks, and just adds in our extra entry for processing. It will output a processed file at build/editor.js and also generate a version and dependency manifest in a build/editor.asset.php file for us.
Next, we need to manually enqueue this script. We’ll add the following to our main php file:
/**
 * Loads the asset file for the given script or style.
 * Returns a default if the asset file is not found.
 */
function fsd_get_asset_file( $filepath ) {

  $PLUGIN_PATH = plugin_dir_path(__FILE__);

	// grab the asset file
	$asset_path = $PLUGIN_PATH . $filepath . '.asset.php';

	// if missing for some reason, can define defaults
	return file_exists( $asset_path )
		? include $asset_path
		: array(
			'dependencies' => array(),
			'version'      => microtime(),
		);
}

/**
 * Enqueue plugin specific editor scripts
 */
function fsd_enqueue_editor_scripts() {

  $PLUGIN_URL = plugin_dir_url(__FILE__);

	// get our asset file with dependencies / version
	$asset_file = fsd_get_asset_file( 'build/editor' );

	// enqueue the script
	wp_enqueue_script(
		'fsd-meta-custom-editor',
		$PLUGIN_URL . 'build/editor.js',
		[...$asset_file['dependencies'], 'wp-edit-post'], // I manually add wp-edit-post here as an extra safety to make sure our deregister happens AFTER any registration
		$asset_file['version']
	);

  // Add Post Types custom data as a variable for our JS to reference
  wp_localize_script( 'fsd-meta-custom-editor', 'postData',
      array(
        'postType' => get_post_type( get_the_id() ),
      )
  );
}
add_action( 'enqueue_block_editor_assets', 'fsd_enqueue_editor_scripts' );
I know this looks like a lot of code just to add some javascript – and it is, but it’s really just boilerplate.
We’re doing several things here. The first function is just a helper to process our asset.php file to read in our dependencies and version. In the second function, we use this data to enqueue the script and then also pass the post type into our script as a variable using wp_localize_script.
Now we can FINALLY write our actual javascript:
import { unregisterBlockType } from '@wordpress/blocks';
import domReady from '@wordpress/dom-ready';

// Unregister our block on all other post types that do not use the metadata
domReady( function () {
  if(postData.postType !== 'property'){
    unregisterBlockType( 'fsd/property-meta-details' );
  }
});
You’ll see the data we passed with wp_localize_script is automatically available in the postData object.
We check the current post type, and if it is not a “property”, we go ahead and unregister the custom block.
Load up the WordPress admin and check your work.
At this point if you edit a page or post you should not see our block. If you create a new property though, you should see the block appearing by default. It should be locked to prevent removal, and you should not be able to add a second one.
Wrapping up
Congratulations!
This was a bit of a marathon! I hope this pattern has opened your eyes to some really cool ways we can start to use the editor for more than just long-form post content.
We didn’t cover it here, but the biggest advantage of this approach is that now we can query, filter, and organize posts by this metadata. I also have an older post where we create an interactive map using posts with latitude/longitude as meta values. This is just one of the cool possibilities post meta unlocks.
As always with WordPress, there are a lot of variations on how you could accomplish something similar to this. I’d love to hear your approach if you’ve done something similar on a personal or client site.

Leave a Reply