This tutorial will be a little different than most of the others in this series.
Rather than follow along for building a specific block or learning a specific technique, I want to go over some file organization and snippets that enable you to create a library of ACF blocks that can be shipped as a plugin, or within a theme.
Note: This post is part of the Block Creator series. These lessons build on each other, so it is recommended to complete them in order to get the most out of the course.
You can find links to all the Block Creator lessons on the main course page. You can also download this finished code from the course Github repo in case you get stuck at any point.
Before diving in, I want to give a huge shoutout to Damon Cook – many of the techniques here can be found in his example ACF github repository. Be sure to check that out as well.
We’ll go through this setup in four stages:
- A plugin for creating multiple basic ACF blocks
- How to use this setup within a theme instead
- Adding @wordpress/scripts to our plugin for modern JS and SCSS compilation
- How to adapt this advanced approach in a theme instead
Note: you will need ACF Pro version 6.2 or newer installed to follow along with this lesson.
Let’s go ahead and jump in!
Creating the basic plugin
To create our basic plugin go ahead and create a new directory in your sandbox WordPress install within the /wp-content/plugins directory. I’ll call mine “acf-multi-block”.
Then create your main entry point php file within this directory:
<?php
/**
 * Plugin Name:       10 - ACF Multi Block plugin
 * Description:       A demo plugin for multi-block dev with ACF
 * Requires at least: 6.3
 * Requires PHP:      7.4
 * Version:           0.0.1
 * Author:            aplauche
 * License:           GPL-2.0-or-later
 * License URI:       https://www.gnu.org/licenses/gpl-2.0.html
 * Text Domain:       fsdacf
 *
 * @package           fsdacf
 */

// Define our constants.
define( 'PLUGIN_DIR', __DIR__ );
define( 'PLUGIN_URL', plugin_dir_url( __FILE__ ) );
Next, we’ll create a couple directories to keep things organized:
- includes: This is where we will put plugin level logic separated by function
- blocks: This is where our actual blocks will live, each within its own folder
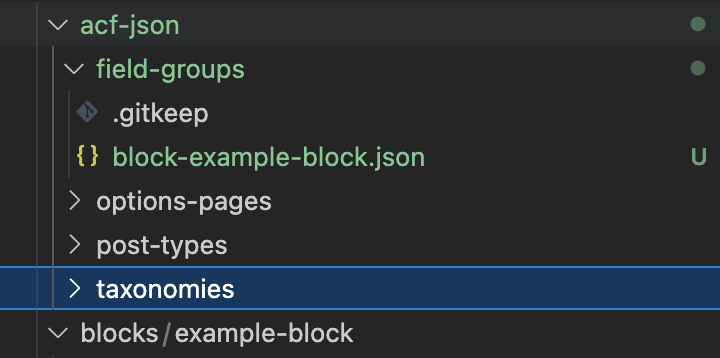
- acf-json: This is where we’ll store the json files that contain the information for all of our custom fields associated with each block
If you are new to ACF, you may not be familiar with acf-json. This allows you to version control your custom fields in a json file instead of just saving them in the database.
By default, ACF will look for this folder in your active theme and dump the field data within it, but it is kind of a mess. Each field group will be its own json file, but the name will be unreadable and settings for pages, blocks, posts, etc will all be grouped together in this one folder.
Luckily this is all configurable!
Go ahead and create a new file within your includes folder called “acf-config.php”.
We’ll drop a few functions in here to make our json files much more organized and readable:
<?php
/**
 * ACF Set custom load and save JSON points.
 */

add_filter( 'acf/json/load_paths', 'fsdacf_json_load_paths' );
add_filter( 'acf/settings/save_json/type=acf-field-group', 'fsdacf_json_save_path_field_groups' );
add_filter( 'acf/settings/save_json/type=acf-ui-options-page', 'fsdacf_json_save_path_option_pages' );
add_filter( 'acf/settings/save_json/type=acf-post-type', 'fsdacf_json_save_path_post_types' );
add_filter( 'acf/settings/save_json/type=acf-taxonomy', 'fsdacf_json_save_path_taxonomies' );
add_filter( 'acf/json/save_file_name', 'fsdacf_json_filename', 10, 3 );


/**
 * Set a custom ACF JSON load path.
 *
 * @link https://www.advancedcustomfields.com/resources/local-json/#loading-explained
 *
 * @param array $paths Existing, incoming paths.
 * @return array $paths New, outgoing paths.
 *
 * @since 0.1.1
 */
function fsdacf_json_load_paths( $paths ) {

	$paths[] = PLUGIN_DIR . '/acf-json/field-groups';
	$paths[] = PLUGIN_DIR . '/acf-json/options-pages';
	$paths[] = PLUGIN_DIR . '/acf-json/post-types';
	$paths[] = PLUGIN_DIR . '/acf-json/taxonomies';

	return $paths;
}

/**
 * Set custom ACF JSON save point for
 * ACF generated post types, field groups, taxonomies, and options pages.
 *
 * @link https://www.advancedcustomfields.com/resources/local-json/#saving-explained
 *
 * @return string $path New, outgoing path.
 *
 * @since 0.1.1
 */
function fsdacf_json_save_path_post_types() {
	return PLUGIN_DIR . '/acf-json/post-types';
}

function fsdacf_json_save_path_field_groups() {
	return PLUGIN_DIR . '/acf-json/field-groups';
}

function fsdacf_json_save_path_taxonomies() {
	return PLUGIN_DIR . '/acf-json/taxonomies';
}

function fsdacf_json_save_path_option_pages() {
	return PLUGIN_DIR . '/acf-json/options-pages';
}

/**
 * Customize the file names for each file.
 *
 * @link https://www.advancedcustomfields.com/resources/local-json/#saving-explained
 *
 * @param string $filename  The default filename.
 * @param array  $post      The main post array for the item being saved.
 *
 * @return string $filename
 *
 * @since  0.1.1
 */
function fsdacf_json_filename( $filename, $post ) {
	$filename = str_replace(
		array(
			' ',
			'_',
		),
		array(
			'-',
			'-',
		),
		$post['title']
	);

	$filename = strtolower( $filename ) . '.json';

	return $filename;
}
Again, major props to Damon Cook for sharing this technique.
Now ACF will drop json files within our plugin as we create fields within the admin. Each field group, settings page, or custom post type created in the admin will have an associated file, stored in the correct directory and named with a slug friendly version of the title itself.
This makes everything much easier to manage.
Our last step is just to make sure to include this in our main entry point file:
// ... Rest of file
// Define our constants.
define( 'PLUGIN_DIR', __DIR__ );
define( 'PLUGIN_URL', plugin_dir_url( __FILE__ ) );

// Includes
require 'includes/acf-config.php';
Now that we are tracking fields with version control, let’s create a block!
Creating a custom ACF Block
To begin, make a new folder in the blocks directory. I’ll just call mine “example-block”.
Create a block.json file and a render.php file for the template.
{
    "name": "acf/example-block",
    "title": "Example ACF Block",
    "description": "Simple ACF block registered through the multiblock setup.",
    "category": "text",
    "icon": "align-left",
    "acf": {
        "renderTemplate": "template.php"
    },
    "supports": {
        "align": false,
        "anchor": false,
        "color": {
            "text": true,
            "background": true
        }
    },
    "style": ["file:./style.css"]
}
<?php
/**
* Example block.
*
* @param array $block The block settings and attributes.
* @param string $content The block inner HTML (empty).
* @param bool $is_preview True during backend preview render.
* @param int $post_id The post ID the block is rendering content against.
* This is either the post ID currently being displayed inside a query loop,
* or the post ID of the post hosting this block.
* @param array $context The context provided to the block by the post or it's parent block.
*/
$block_content = get_field( 'block_content' );
?>
<div <?php echo wp_kses_data( get_block_wrapper_attributes() ); ?>>
<div>
<?php echo esc_html( $block_content ); ?>
</div>
</div>
Finally, let’s also make a style.css file for some very basic styles. That way we can view our block on the frontend and know we hooked everything up correctly:
// This class is autogenerated by WordPress
.wp-block-acf-example-block {
  border: 2px solid black;
  border-radius: 16px;
  padding: 2rem;
}
Now we need to make sure to register this block. Let’s handle that in a new include file called “register-blocks.php”.
<?php
function fsdacf_register_all_blocks() {
	$block_directories = glob(PLUGIN_DIR . "/blocks/*", GLOB_ONLYDIR);

	foreach ($block_directories as $block) {
		register_block_type( $block );
	}
}
add_action( 'init', 'fsdacf_register_all_blocks' );
We’ve used this exact code before. This will auto-detect all our blocks we create in the blocks directory, and register them based on the folder name.
Note: There is an even easier way to auto-detect and register all your blocks now with WordPress 6.8
In addition, this would be a good place to throw in a snippet to create your own custom block category. (or multiple categories if you choose to!)
Once again, don’t forget to include this file in our main entry point:
// ... Rest of file
// Define our constants.
define( 'PLUGIN_DIR', __DIR__ );
define( 'PLUGIN_URL', plugin_dir_url( __FILE__ ) );

// Includes
require 'includes/acf-config.php';
require 'includes/register-blocks.php';
Awesome. At this point go ahead and pull up your WordPress dashboard and activate the plugin.
Now it’s time to create some ACF fields to show how this all works together.
Creating ACF fields for our block
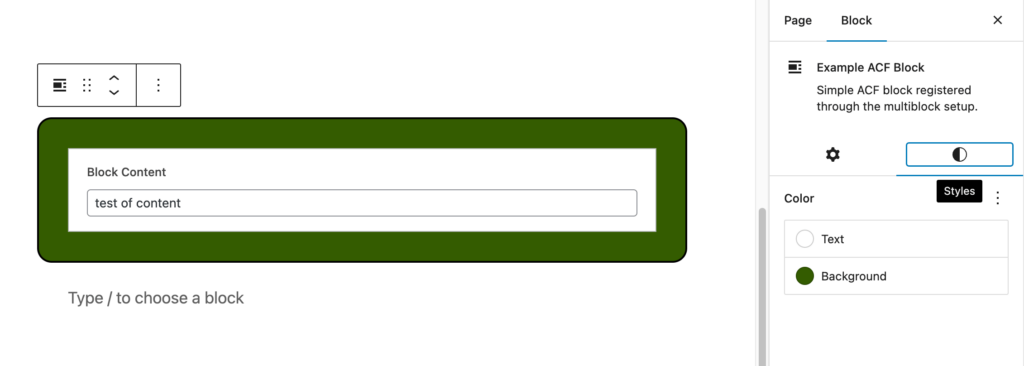
Open the ACF settings page and create a new field group. Before getting too far into it, scroll to the bottom and make sure you can successfully assign the group to our block.
Add a simple text field called content so that we can make sure everything is working correctly with our block setup.
Once saved, if you go back to your file editor you should see a new json file within the acf-json/field-groups/ directory!
Go ahead and jump into a post or page and insert the block. You should be able to click on it and edit the content field. You should also be able to use the background and text color styles supported by the editor.
Enter some text, adjust your colors, save, and view on the frontend to make sure everything is working.
At this point feel free to duplicate your block folder and rename it to create a second block. Your registration function will automatically pick it up and register it. All you have to do is make any adjustments to the block.json and template files, create any applicable fields in the admin, and finally save them and you’re good to go!
Creating ACF block libraries packaged within themes
Before we jump into more complex build processes, I want to address how to transfer this setup into a theme.
This is ideal if you are creating blocks for a one-off client site and will not ever use them again.
To transfer our simple setup is actually really straightforward!
Basically, we’ll take everything from our entry point php file and move it to the functions.php file within our theme – with a quick tweak:
// Define our constants.
define( 'FSD_THEME_DIR', __DIR__ );

// Includes
require 'includes/acf-config.php';
require 'includes/register-blocks.php';
Next, we would copy the whole acf-json folder with all the subdirectories, and the whole blocks folder with any subdirectories for your existing block(s) and paste them both into the root level of our theme.
Finally, we would grab all our php files within the includes folder of our plugin and move them to the includes folder within our theme. (you could create one if you don’t already have one).
Then we would perform a quick search and replace in the includes files to make sure they are using our new FSD_THEME_DIR constants instead of the old PLUGIN_DIR constants.
Once all of this is in place you could start building out your theme specific blocks!
New blocks will be auto-registered and custom fields created in the admin will save to the appropriate place in the acf-json directory. All your blocks and their associated fields can be version tracked within your theme.
You can go ahead and try this in a theme of your own if you like. Don’t forget to deactivate the plugin we’ve been working on if it is installed on the same site! Otherwise, you might get conflicts from registering the same blocks twice.
For now, we’ll jump back into our plugin to create more advanced blocks with a build process step.
Supporting more advanced blocks with a build process
Now we’ve got a great setup for building multiple ACF blocks and keeping all our fields version controlled within a plugin.
What if we want to do some more advanced stuff and support React and use SCSS or some other fancy CSS with our blocks?
Let’s set up @wordpress/wp-scripts .
Navigate to your plugin directory and go ahead and run npm init -y to spin up a package.json file.
Next install our favorite package: npm install @wordpress/scripts --save-dev
Now we can modify our package.json file to include a start and build script:
{
  "name": "10-acf-multi-block",
  "version": "1.0.0",
  "description": "",
  "main": "index.js",
  "scripts": {
    "start": "wp-scripts start",
    "build": "wp-scripts build"
  },
  "keywords": [],
  "author": "",
  "license": "ISC",
  "devDependencies": {
    "@wordpress/scripts": "^26.18.0"
  }
}
By default, the package will search for a “src” folder and use the block.json files to determine entry points. You could rename your “blocks” directory to “src”, but you can also customize this behavior!
  "scripts": {
    "start": "wp-scripts start --webpack-src-dir=blocks --webpack-copy-php",
    "build": "wp-scripts build --webpack-src-dir=blocks --webpack-copy-php"
  },
The last argument also tells webpack to copy the php template file as well, otherwise webpack will ignore it.
If you run the start command now, you will see an error about not discovering any entry points. This is because the scripts package uses webpack under the hood, and needs a javascript entry file to work properly.
Go ahead and add an index.js file to your example block folder and import your style.css file within it:
import './style.css'Finally, we need to add an entry for this new javascript file to our block.json file:
{
    "name": "acf/example-block",
    "title": "Example ACF Block",
    "description": "Simple ACF block registered through the multiblock setup.",
    "category": "text",
    "icon": "align-left",
    "acf": {
        "renderTemplate": "template.php"
    },
    "supports": {
        "align": false,
        "anchor": false,
        "color": {
            "text": true,
            "background": true
        }
    },
    "style": ["file:./style.css"],
    "script": ["file:./index.js"]
}
Go ahead and run npm run start
You should see a build folder created that matches our blocks folder, but with compiled assets.
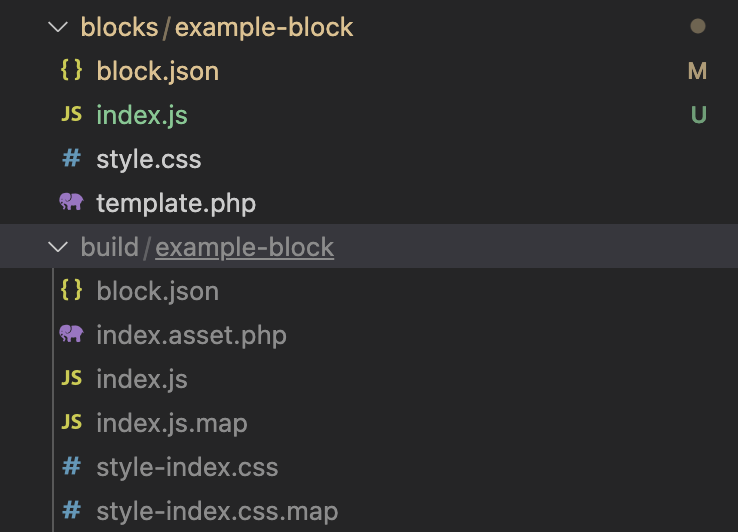
One quick note: you’ll notice the css file is now called “style-index.css” once compiled. This is a bit annoying, but we need to update our block.json to recognize this:
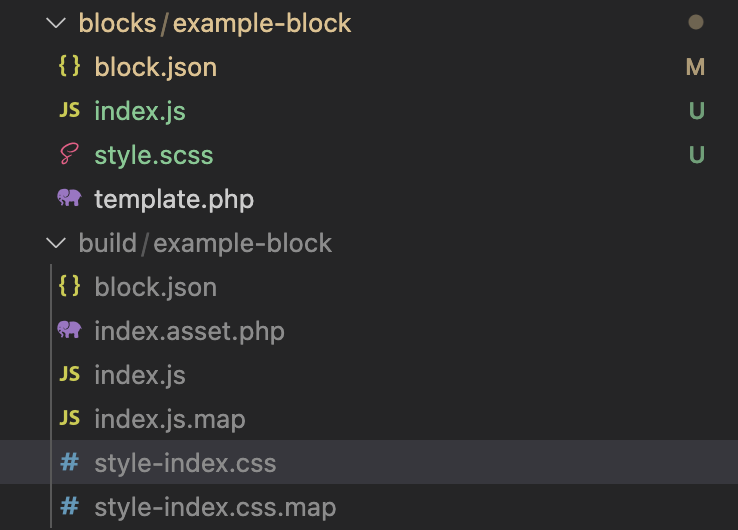
"style": ["file:./style-index.css"],If we want to take advantage of scss now, we can just change our css file to “style.scss”. Don’t forget to adjust the import in the index.js file as well. I’ve added an scss variable to prove it is working:
$black: #000;

.wp-block-acf-example-block {
  border: 2px solid $black;
  border-radius: 16px;
  padding: 2rem;
}
import './style.scss'You may need to stop and rerun the dev process, but you should see this SCSS file transformed into a minified “style-index.css” file within our build directory.
We do have to make one more important adjustment though!
Right now, our plugin is registering our blocks from the “blocks” directory. This is fine when we aren’t using a build process, but now will break. WordPress won’t know what to do with the SCSS file.
All we need to do is modify the registration logic to look in the build folder instead of our blocks folder where are uncompiled source code is:
<?php


function fsdacf_register_all_blocks() {
	$block_directories = glob(PLUGIN_DIR . "/build/*", GLOB_ONLYDIR);

	foreach ($block_directories as $block) {
		register_block_type( $block );
	}
}
add_action( 'init', 'fsdacf_register_all_blocks' );
That’s it!
You should now be able to use the block again, create new blocks, and register fields just like before, but now you have a build script.
NOTE: adding a build process unlocks a lot of possibility, but it also complicates things. Ideally if you use this on a real site, you would need to have a deployment pipeline setup. That way you could .gitignore the build folder and have your deploy pipeline take care of builds whenever you push updates. Some web hosts like pantheon instead encourage you to track the whole build folder, but most consider this not a good practice.
Handling block build processes within themes
To migrate this setup into a theme is not too difficult. For the most part you can follow the same steps as migrating our simple block setup:
- Pull over the code from the entry point php file into functions.php and rename the constant for the directory path
- Pull over the acf-json folder and the blocks folder with everything inside
- Migrate the includes file and replace all instances of the old PLUGIN_DIR constant with your new THEME_DIR constant.
The only tricky part is the build process. If you are planning to use a build process for your theme files at all and just need it for the blocks it’s relatively simple.
You just need to run npm init -y within your theme to create a package.json file.
Then install @wordpress/scripts with npm i @wordpress/scripts --save-dev
Finally, you can add the custom scripts to your theme package.json file:
  "scripts": {
    "start": "wp-scripts start --webpack-src-dir=blocks --webpack-copy-php",
    "build": "wp-scripts build --webpack-src-dir=blocks --webpack-copy-php"
  },
At this point you should be able to compile your blocks and have everything function as with our plugin.
Compiling theme and block assets together
It’s a bit tricker to use @wordpress/scripts to compile assets for your theme, in addition to your blocks.
Let’s imagine your theme looks something like this:
index.php
single.php
blocks/
-- example-block
-- example-block-2
src/
-- scss/
---- components/
---- style.scss
-- js/
---- modules/
---- index.js

... other files and folders
To handle this setup I’d recommend taking a look at this post where I dive deeper into setting up themes with @wordpress/scripts. The basic idea is to have a separate entry point and output for our generic theme styles and JS.
We could do this by creating a custom webpack.config.js file, or we can simply make our own custom script setup within our package.json file like so:
"scripts": {
    "start:theme": "wp-scripts start src/index.js --output-path=build/theme",
    "build:theme": "wp-scripts build src/index.js --output-path=build/theme",
    "start:blocks": "wp-scripts start --webpack-src-dir=blocks --webpack-copy-php --output-path=build/blocks",
    "build:blocks": "wp-scripts build --webpack-src-dir=blocks --webpack-copy-php --output-path=build/blocks"
  },
Now we have separate scripts for each process with separate output paths. We just need a way to run them all. You can use the npm-run-all package for this:
npm i npm-run-all --save-devNow, we can add two last scripts:
"scripts": {
    "start:theme": "wp-scripts start src/index.js --output-path=build/theme",
    "build:theme": "wp-scripts build src/index.js --output-path=build/theme",
    "start:blocks": "wp-scripts start --webpack-src-dir=blocks --webpack-copy-php --output-path=build/blocks",
    "build:blocks": "wp-scripts build --webpack-src-dir=blocks --webpack-copy-php --output-path=build/blocks",
"start": "npm-run-all --parallel start:theme start:blocks",
"build": "npm-run-all --parallel build:theme build:blocks"
  },
Awesome. Now when we run the process we will get a build folder with two subdirectories, “blocks” and “theme”, that contain our assets.
Don’t forget that while block assets are enqueued automatically, you need to manually enqueue your theme assets. We can add something like this to the functions.php file:
function custom_scripts_and_styles() {
  $ASSET_INFO = include get_stylesheet_directory() . '/build/theme/index.asset.php';
  wp_enqueue_style( 'custom-style', get_stylesheet_directory_uri() . '/build/theme/index.css', array(), $ASSET_INFO['version'] );
  wp_enqueue_script( 'custom-script', get_stylesheet_directory_uri() . '/build/theme/index.js', $ASSET_INFO['dependencies'], $ASSET_INFO['version'] );
}
add_action( 'wp_enqueue_scripts', 'custom_scripts_and_styles' );
Again, you can learn more about what this does looking at my previous post on theme development with @wordpress/scripts.
Once in place, you should now be able to run npm run start and work on your custom blocks as well as your generic theme assets and have everything compile in the background automatically. This is a great setup for bespoke client themes with their own one-off block libraries.
Wrapping up
Congratulations!
If you’ve been following the Block Creator series this is the very last lesson I had planned!
Hopefully you feel much more confident creating custom blocks from scratch and with ACF in a variety of settings.
I will likely continue to add to this course in the future, but over the past 10 lessons we have covered the most important aspects of custom block development. Feel free to contact me if you have trouble with any of the lesson material – or have additional questions.
Cheers!

Leave a Reply