I’ve been a huge fan of tailwind since it came out, but with recent updates like default “just-in-time” mode and css purging, I think its a no-brainer use for building out themes in Gutenberg.
The atomic utility class focused approach pairs perfectly with Gutenberg blocks and the new Theme.json file and allows for a super rapid development workflow.
Even better, you can use the @wordpress/scripts package for compilation and not even touch a webpack config file.
That said, I ran into a few hiccups the first time I tried to set this up, so hopefully this will help you get up and running without the learning curve.
Structuring the Basic Theme
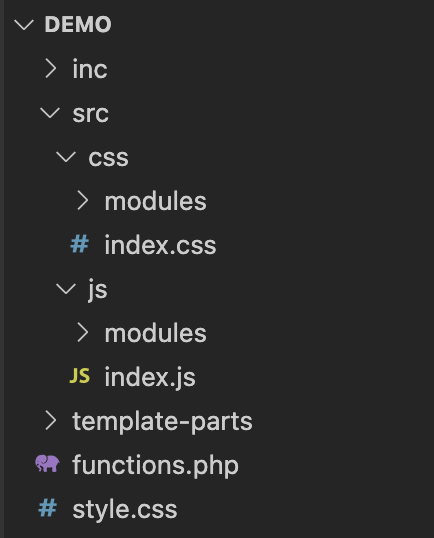
We’ll start with a basic theme with the following structure:
All our js/css will be in the src folder and when we run our compilation a “build” folder will be created at the root level with our compiled css/js as well as a php file that tracks versioning and dependencies (more on that later!)
First run npm init -y to get a package.json file.
Next lets install the dependencies. You’ll see there’s a refreshingly small amount. This is because @wordpress/scripts is doing most of the heavy lifting for us!
npm i --save-dev @wordpress/scripts tailwindcss globTheme.json
If you’ve never used the theme.json file I suggest you check out this article on modern theme development to get a quick crash course. We’ll go ahead and create a basic one with color and typography settings.
{
  "version": 2,
  "settings": {
    "typography": {
      "fontFamilies": [
        {
          "fontFamily": "\"ClashDisplay\", serif",
          "slug": "title",
          "name": "Title"
        },
        {
          "fontFamily": "Satoshi, sans-serif",
          "slug": "body",
          "name": "body"
        }
      ],
      "customFontSize": false,
      "dropCap": false,
      "fontWeight": false,
      "fontStyle": false,
      "textTransform": false,
      "textDecoration": false
    },
    "color": {
      "custom": false,
      "customGradient": false,
      "palette": [
        {
          "slug": "primary",
          "color": "#E08D73",
          "name": "Primary"
        },
        {
          "slug": "secondary",
          "color": "#ee964b",
          "name": "Secondary"
        },
        {
          "slug": "dark",
          "color": "#4d4d4d",
          "name": "Dark"
        },
        {
          "slug": "light",
          "color": "#f9f9f9",
          "name": "Light"
        },
        {
          "slug": "white",
          "color": "#ffffff",
          "name": "White"
        },
        {
          "slug": "black",
          "color": "#333333",
          "name": "Black"
        }
      ]
    }
  }
}
Tailwind Setup
If you are new to Tailwind I suggest you check out the docs here.
This is where things get interesting. We are going to dynamically import our Theme.json setup and configure tailwind from it so that you don’t have to define colors and styles twice.
Drop in a tailwind.config.js file and add the following:
/**
 * See https://tailwindcss.com/docs/configuration for configuration details
 */

/**
 * Convert pixels to rems
 * @param {int} px The pixel value to convert to rems
 */


const fs = require( 'fs' )
const glob = require('glob')

const themeJson = fs.readFileSync( './theme.json' )
const theme = JSON.parse( themeJson )

const rem = px => `${px / 16}rem`


let colors = {}
theme.settings.color.palette.forEach(color => {
  colors[color.slug] = color.color
})

let fonts = {}
theme.settings.typography.fontFamilies.forEach(fam => {
  fonts[fam.slug] = fam.fontFamily.split(',')
})


module.exports = {
  content: [
    './inc/**/*.php',
    './template-parts/**/*.php',
  ].concat(glob.sync("./*.php")),
  // have to use glob sync because otherwise base folder becomes tw dependency and infinite loop because of index.asset.php
  // glob returns array of actual files and this way build folder is definitively ignored
  theme: {
    fontFamily: fonts,
    extend : {
      colors: colors,
    }
  }
}
We are basically reading in our theme.json config and passing into tailwind. With this in mind you want to take care with what you name your variable in the theme.json, because these will become your utility classes that you use to style elements.
Important note:
You may notice in the “content” section of tailwind we have a kind of strange setup. The way this content parameter works is that any folder that contains files that match the pattern is added to the tailwind watch list. Under many normal circumstances you might be able to get away with something like this:
  content: [
    './**/*.php'
  ]
In our setup however, a php file is going to be generated in the build folder, this will cause an infinite reload loop. In order to avoid this we use glob to generate an array of the php files at the root level and then also include specific folder that we want to watch. This is just a side effect of how tailwind handles the ** operator that we have to look out for.
If you ever find your compilation process looping, just take a look at the content settings as this is most likely the culprit.
Compilation
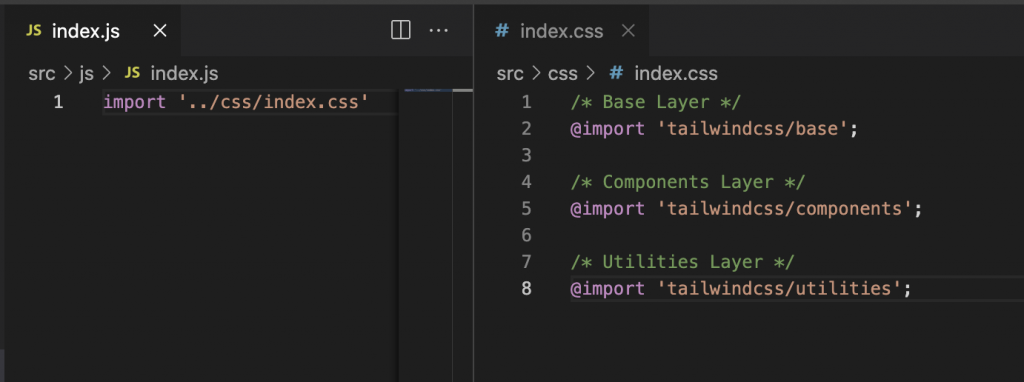
Okay, now we are ready to get this thing running. First let’s create our basic index.css and index.js files with the tailwind starter imports.
Now, we do need on more config file for PostCSS, which is what tailwind uses under the hood.
If you look at the tailwind documentation they will show you this as a good starting point. It enables nesting like Sass, and uses autoprefixer for older browsers. Go ahead and drop this file in the root theme directory.
// postcss.config.js
module.exports = {
  plugins: {
    'postcss-import': {},
    'tailwindcss/nesting': {},
    tailwindcss: {},
    autoprefixer: {},
  }
}
Now we are ready to go, we just need to make some script commands in the package.json file. Add in the following “compile” script as well as the build script for when you actually are ready to deploy.
The build script will minify and not include source maps by default, again no extra setup needed!
  "scripts": {
    "compile": "wp-scripts start src/js/index.js ",
    "build": "wp-scripts build src/js/index.js ",
  },
Now let’s run npm run compile
Check out your new build folder!
It has the compiled assets, and even better it has a php file that exports an array with a version hash and a dependency array for the compiled files.
<?php return array('dependencies' => array(), 'version' => '3bd0181a7e87853b2fed');
We can jump into functions.php and set up the enqueue script to use this and now we never have to worry about manually versioning to bust caches, or managing dependencies manually for our script!
 /**
 * Enqueue scripts and styles.
 */
function demo_scripts() {
	wp_enqueue_style(
    'demo-style',
    get_stylesheet_directory_uri() . '/build/index.css',
    array(),
    (include get_template_directory() . '/build/index.asset.php')['version']
  );

	wp_enqueue_script(
    'demo-js',
    get_template_directory_uri() . 'build/index.js',
    (include get_template_directory() . '/build/index.asset.php')['dependencies'],
    (include get_template_directory() . '/build/index.asset.php')['version'],
    true
  );

}
add_action( 'wp_enqueue_scripts', 'demo_scripts' );
Bonus: Hot-Reload
We are now all setup for WordPress to watch and compile our css/scripts, but wouldn’t it be nice if we could also have browser sync setup so we don’t have to reload to see changes?
No biggie!
Just install browser sync along with npm-run-all
npm i --save-dev browser-sync npm-run-allThen add two more commands to the package.json file:
  "scripts": {
    "compile": "wp-scripts start src/js/index.js ",
    "build": "wp-scripts build src/js/index.js ",
    "develop": "npm-run-all --parallel compile sync",
    "sync": "browser-sync start --proxy 'localurlhere.local' --files 'build/*'"
  },
Now our develop command will run the compilation and also start up a browser sync window where it will inject css changes so we can instantly see our code modifications in realtime.
You’ll just want to make sure it is proxying your local development url. You can also add php files to the watchlist as will if you’d like!
Enjoy!

Leave a Reply