Eleventy is one of my favorite web development tools to work with because it is so fast to get started with, but can handle a surprising amount of complex logic.
In this post, I’ll share my go-to setup for rapidly developing static sites and landing pages when a full CMS may be overkill. We’ll use Eleventy, Vite, Tailwind, and Alpine.js.
This stack gives us some great interactivity options while being super lightweight and scoring perfect across the board with lighthouse page speed tests.
You can grab the starter kit from my Github account if you’d like to follow along.
Tooling & folder structure
Before jumping into some of the features and how to use this starter, let’s look at the folder structure.
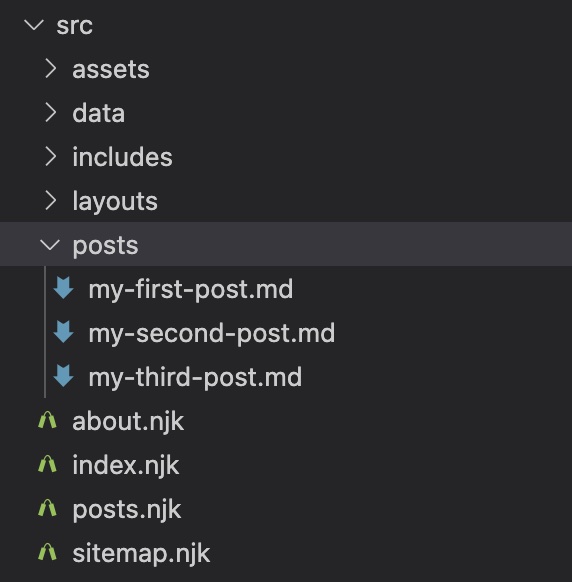
At the root level we have a handful of configuration files, but most of the action will take place in our src directory. Within this folder you can add Nunjuck template files or simple markdown files to represent new pages of the site.
The starter comes with a couple example pages and a blog post collection you can build from, but you can also empty it out if you are just making a landing page. We’ll go deeper into options for pages in the following sections.
For styling, in our assets folder we have a single entry point css file that imports Tailwind. You can add additional css here or just stick to using utility classes in your templates.
@tailwind base;
@tailwind components;
@tailwind utilities;
Similarly, we have an entry Javascript file that sets up Alpine.js.
import '../css/index.css';
import Alpine from 'alpinejs'

window.Alpine = Alpine

// Add Alpine extensions here

Alpine.start()
On the home page of the starter you can see a simple example of using Alpine to create an interactive counter with state.
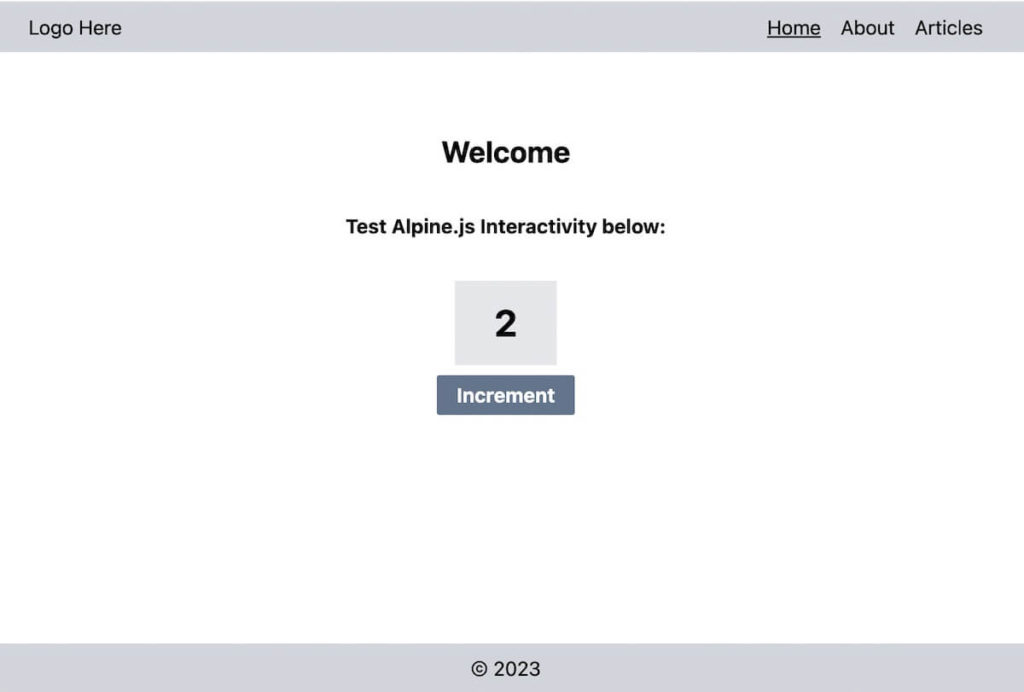
<section class="font-bold">

  <h1 class="text-2xl text-center mb-8">Welcome</h1>
  <p class="text-center mb-8">Test Alpine.js Interactivity below:</p>

  <div x-data="{ count: 0 }" class="flex flex-col justify-center items-center">
    <span x-text="count" class="text-3xl px-8 py-4 bg-gray-200  mb-2"></span>
    <button class="bg-slate-500 text-white py-1 px-4 rounded-sm hover:bg-slate-600" x-on:click="count++">Increment</button>
  </div>

</section>
If you are new to Alpine.js, it is an extremely lightweight framework for creating interactivity and I highly recommend checking out their docs.
Between Alpine and Tailwind we can accomplish 90% of styling and interactivity needs without needing additional purpose built libraries that add weight to the site.
Eleventy Configuration
At the root level of the project you’ll find an eleventy.config.js file. This sets up all the options and plugins for Eleventy to bundle and run your project. One of my beefs with some of the starters on Eleventy’s own website is that this file tends to get pretty large, and some of them add a crazy amount of plugins etc. without explanation.
In this starter I’ve tried to keep it down to the basics that I use for every project. Let’s run through the settings (and why they are there) below:
Global Site Data
You can configure this to your own site, but it acts as a fallback for SEO meta titles and descriptions in case you forgot to add specific meta to a page. The base url is used for creating meta tags that require an absolute url (like og:image tags).
const baseUrl = process.env.BASE_URL || "http://localhost:8080";
console.log('baseUrl is set to ...', baseUrl);

const globalSiteData = {
  title: "11ty Starter Site",
  description: "This is a basic 11ty starter template with my most commonly used features and modern tooling",
  locale: 'en',
  baseUrl: baseUrl,
}

module.exports = function(eleventyConfig) {

  /* --- GLOBAL DATA --- */

  eleventyConfig.addGlobalData("site", globalSiteData);

// Continued below...
You will see an .env.sample file in the starter. Go ahead and copy this and rename it to just .env and then you can set the base url to your site’s domain. We only use this for SEO tags, so it’s not a big deal while developing locally.
BASE_URL=https://example.comYAML Support
This is optional, but the syntax of yaml is a lot more readable than json, so it is usually preferable for dev/user experience.
  /* --- YAML SUPPORT --- */

  eleventyConfig.addDataExtension("yaml", contents => yaml.load(contents));
  eleventyConfig.addDataExtension("yml", contents => yaml.load(contents));
Passthroughs
Next, we add a couple passthroughs, which are just folders that we copy over into our build. We add the CSS and JS folder that Vite will then pick up and handle bundling for:
 /* --- PASSTHROUGHS --- */

 eleventyConfig.addPassthroughCopy('src/assets/css')
eleventyConfig.addPassthroughCopy('src/assets/js')
Plugins
Okay now we are getting to the fun part. Plugins extend the functionality of Eleventy:
  /* --- PLUGINS --- */

  eleventyConfig.addPlugin(pluginRss); // just includes absolute url helper function
  eleventyConfig.addPlugin(eleventyNavigationPlugin);
eleventyConfig.addPlugin(EleventyVitePlugin, {});- Vite – Allows us to compile our assets and run our development server with Vite, which has become the industry standard.
- Navigation – This is an amazing plugin that let’s us easily build and display navigation menus for our site without having to hardcode them into a template. (more on this later)
- RSS – This just gives us a helper function that is used for our SEO meta tags.
Shortcodes
Next, you can add your own shortcodes. I made the decision to not include a bunch of boilerplate ones here, but there are two that I think are key and used in almost every project.
First is the image short code. This lets us use responsive imagery with the srcset attribute automatically without hand coding it or providing multiple image sizes.
// Image shortcode config
let defaultSizesConfig = "(min-width: 1200px) 1400px, 100vw"; // above 1200px use a 1400px image at least, below just use 100vw sized image

  eleventyConfig.addShortcode("image", async function(src, alt, sizes=defaultSizesConfig) {
		console.log(`Generating image(s) from:  ${src}`)
    let metadata = await Image(src, {
			widths: [800, 1500],
			formats: ["webp", "jpeg"],
      urlPath: "/images/",
			outputDir: "./_site/images/",
			filenameFormat: function (id, src, width, format, options) {
				const extension = path.extname(src)
				const name = path.basename(src, extension)
				return `${name}-${width}w.${format}`
			}
		});

		let imageAttributes = {
			alt,
			sizes,
			loading: "lazy",
			decoding: "async",
		};

		return Image.generateHTML(metadata, imageAttributes);
	});
Eleventy will now generate images sizes based on your settings at build time and transform the tag into a responsive image with srcset attributes and lazy loading. All you have to do is include images like so:
{% image "example.jpg", "alt text description" %}
<!-- OR to give a custom srcset -->
{% image "example.jpg", "alt text description", "(min-width: 30em) 50vw, 100vw" %}
Too cool.
Try to keep your image sizes array to two or three max, otherwise if you add a ton of images your build time could start suffering.
The other shortcode is just for outputting the current year for copyright notices:
  // Output year for copyright notices
  eleventyConfig.addShortcode("year", () => `${new Date().getFullYear()}`);
This is used in the footer include file so you don’t have to remember to update it:
<footer class="w-full bg-gray-300 py-2 text-center mt-auto">
<div class="copyright">
© {% year %}
</div>
</footer>Filters
Filters are similar to shortcodes, but essentially they just take an input, modify it with some javascript and then return it for output in the template.
I only included one that just generates a random string. This is a handy utility if you are looping through items in a template and need unique ids for each.
  /* --- FILTERS --- */

  // Custom Random Helper Filter (useful for ID attributes)
  eleventyConfig.addFilter("generateRandomIdString", function (prefix) {
    return prefix + "-" + Math.floor(Math.random() * 1000000);
  });
whew… almost done!
Base Configuration
Finally, we just have our directory and templating settings for Eleventy. You can customize this how you’d like for you project, but I mostly kept the Eleventy defaults for folder structure and selected Nunjucks as the template language. This is because it has a relatively easy syntax and supports the most Eleventy related features out of the box.
  /* --- BASE CONFIG --- */

  return {
    dir: {
      input: "src",
      output: "_site",
      includes: "includes", // this path is releative to input-path (src/)
      layouts: "layouts", // this path is releative to input-path (src/)
      data: "data", // this path is releative to input-path (src/)
    },
    templateFormats: ["njk", "md"],
    htmlTemplateEngine: "njk",
    markdownTemplateEngine: "njk",
  };
Putting it all together
Done! Take a look at the full config file shown below:
const pluginRss = require("@11ty/eleventy-plugin-rss"); // needed for absoluteUrl SEO feature
const eleventyNavigationPlugin = require("@11ty/eleventy-navigation");
const EleventyVitePlugin = require("@11ty/eleventy-plugin-vite");
const Image = require("@11ty/eleventy-img");
const yaml = require("js-yaml"); // Because yaml is nicer than json for editors
require('dotenv').config();

const baseUrl = process.env.BASE_URL || "http://localhost:8080";
console.log('baseUrl is set to ...', baseUrl);

const globalSiteData = {
  title: "11ty Starter Site",
  description: "This is a basic 11ty starter template with my most commonly used features and modern tooling",
  locale: 'en',
  baseUrl: baseUrl,
}

module.exports = function(eleventyConfig) {

  /* --- GLOBAL DATA --- */

  eleventyConfig.addGlobalData("site", globalSiteData);

  /* --- YAML SUPPORT --- */

  eleventyConfig.addDataExtension("yaml", contents => yaml.load(contents));
  eleventyConfig.addDataExtension("yml", contents => yaml.load(contents));

  /* --- PASSTHROUGHS --- */

  eleventyConfig.addPassthroughCopy('src/assets/css')
	eleventyConfig.addPassthroughCopy('src/assets/js')


  /* --- PLUGINS --- */

  eleventyConfig.addPlugin(pluginRss); // just includes absolute url helper function
  eleventyConfig.addPlugin(eleventyNavigationPlugin);
  eleventyConfig.addPlugin(EleventyVitePlugin, {});

  /* --- SHORTCODES --- */

  // Image shortcode config
  let defaultSizesConfig = "(min-width: 1200px) 1400px, 100vw"; // above 1200px use a 1400px image at least, below just use 100vw sized image

  eleventyConfig.addShortcode("image", async function(src, alt, sizes=defaultSizesConfig) {
		console.log(`Generating image(s) from:  ${src}`)
    let metadata = await Image(src, {
			widths: [800, 1500],
			formats: ["webp", "jpeg"],
      urlPath: "/images/",
			outputDir: "./_site/images/",
			filenameFormat: function (id, src, width, format, options) {
				const extension = path.extname(src)
				const name = path.basename(src, extension)
				return `${name}-${width}w.${format}`
			}
		});

		let imageAttributes = {
			alt,
			sizes,
			loading: "lazy",
			decoding: "async",
		};

		return Image.generateHTML(metadata, imageAttributes);
	});

  // Output year for copyright notices
  eleventyConfig.addShortcode("year", () => `${new Date().getFullYear()}`);


  /* --- FILTERS --- */

  // Custom Random Helper Filter (useful for ID attributes)
  eleventyConfig.addFilter("generateRandomIdString", function (prefix) {
    return prefix + "-" + Math.floor(Math.random() * 1000000);
  });


  /* --- BASE CONFIG --- */

  return {
    dir: {
      input: "src",
      output: "_site",
      includes: "includes", // this path is releative to input-path (src/)
      layouts: "layouts", // this path is releative to input-path (src/)
      data: "data", // this path is releative to input-path (src/)
    },
    templateFormats: ["njk", "md"],
    htmlTemplateEngine: "njk",
    markdownTemplateEngine: "njk",
  };
};
Using the Eleventy and Vite starter
I won’t go through a full deep dive of how to get started with Eleventy here since there are already a lot of great resources on the basics. Instead, I’ll just point out some of the best features of this template and how to take advantage of them.
First off, you can run the starter by first installing dependencies with npm install, and then running npm run dev.
The starter includes one base layout that you can build from with a separate header and footer include file, as well as a separate include for all the various SEO meta tags.
The header file uses the navigation plugin we installed in our config to build out a nav menu:
<header class="w-full bg-gray-300  py-2">
  <div class="container mx-auto flex justify-between">
    <div class="logo">
      <a href="/">Logo Here</a>
    </div>
    <div>
      {{ collections.all | eleventyNavigation | eleventyNavigationToHtml({

        listElement: "ul",
        listItemElement: "li",

        listClass: "flex gap-4",
        listItemClass: "",

        listItemHasChildrenClass: "has-submenu",
        anchorClass: "",

        activeListItemClass: "active",
        activeAnchorClass: "active",

        activeKey: eleventyNavigation.key,
        showExcerpt: false

      }) | safe }}
    </div>
  </div>
</header>
You can configure the options here to add specific classes to active links, submenus, anchor links, etc.
From your pages, you can then use Eleventy’s front matter system to add the page to the navigation menu like so:
---
layout: base
eleventyNavigation:
  key: About
  order: 2
meta:
  title: About us
  description: this is our about page.
---


<section class="font-bold">
  This is the about page
</section>
You can see in addition to adding “About” to the navigation menu we can tell our page what layout to inherit (if we added multiple layout options), and configure SEO settings for the page.
If we leave off the meta settings it’s no problem though, our meta include file has fallback options as well.
Enjoying the read?
Join 500+ developers and learn modern WordPress, JAMStack, and javascript frameworks with a monthly development newsletter geared towards agencies and freelancers.
Using the blog functionality
This starter also comes ready to go with a /posts page that will display blog posts that we can write in markdown. In our src/ directory you will see a posts directory with three sample posts in it. They are super simple to write and use a similar front matter + content approach as pages:
---
layout: base
title: My First Post
tags: post
---

Hello from {{ title }}!
We could certainly add a second layout specific for our blog and use that for posts instead as well.
You’ll also notice the “tags” property. This adds the page/post to the Eleventy collection of “posts”. Eleventy collections are super powerful and I recommend you read more about them here if you are new to this concept. We could use tags to organize our posts into subjects as well, but the basic starter just uses the one “post” collection.
So how do we display all our posts?
In the root src/ directory you can open up posts.njk. This is the template for our main posts page and you will see it has a bunch of extra frontmatter:
---
layout: base
eleventyNavigation:
  key: Articles
  order: 3
pagination:
  data: collections.post
  size: 12
  alias: posts
meta:
  title: Posts archive
  description: this is where you can find all our posts.
---

<section class="font-bold">
  <h1 class="text-center mb-8">All Articles</h1>
  <ul>
    {% for post in posts %}
      <li class="">
        <a class="block text-center rounded-md w-full bg-gray-200 py-4 mb-2 hover:bg-gray-300" href="{{post.url}}">{{ post.data.title }}</a>
      </li>
    {% endfor %}
  </ul>

  <div class="w-full flex justify-center gap-4 py-4">
    {% if pagination.href.previous %}
      <a href="{{pagination.href.previous}}">Previous Page</a>
    {% endif %}
    {% if pagination.href.next %}
      <a href="{{pagination.href.next}}">Next Page</a>
    {% endif %}
  </div>
</section>
Some of this should look super familiar, but there are some new things as well.
In the front matter we have a “pagination” setting. Here we can pass in a collection to paginate as data. We give it a per-page size, and then can give it an alias. That way we can refer to “posts” in our template and it will be referencing the pagination data.
In our template, we loop through to display all the posts and add “Next” and “Previous” links if they exist. If you only have three posts like in the starter, pagination.href.next will return null and no link will be shown.
Building a pagination system doesn’t get much easier than that! You can learn more about all the options for pagination in the paginate documentation for Eleventy.
Bonus: Sitemap
One last little feature in this starter is a sitemap file. You shouldn’t need to modify this in most cases. When you build your site, a sitemap.xml file will be automatically generated as well. The template looks like this for the curious:
---
permalink: /sitemap.xml
eleventyExcludeFromCollections: true
---
<?xml version="1.0" encoding="utf-8"?>
<urlset xmlns="http://www.sitemaps.org/schemas/sitemap/0.9">
    {% for page in collections.all %}
        <url>
            <loc>{{ site.baseUrl }}{{ page.url | url }}</loc>
            <lastmod>{{ page.date.toISOString() }}</lastmod>
        </url>
    {% endfor %}
</urlset>
You can see two new front matter options that may come in handy for other pages. First, You can manually set the permalink for a page instead of using the default file structure and name.
You can also make sure to exclude the page from any collections. This way when you loop over your pages to build a nav menu or something like that, the XML sitemap will not be included accidentally. This could be handy for a “Thank you” page or something like that as well.
Wrap up
I love using this set up for quick static sites and landing pages that don’t require a whole CMS. Using Tailwind and Alpine to add styling and functionality is extremely efficient. You can also deploy the site on simple hosting like Netlify painlessly.
2024 Update
I still use this setup for a lot of static sites, but I have also been transitioning to using Astro especially for headless WordPress sites and so far am loving it. I don’t necessarily think one is better than the other, but I’d recommend doing a small project with both Eleventy and Astro and seeing which workflow feels more natural to you.
If you’re interested in a similar starter for bigger WordPress sites, check out my article about getting running with WP Scripts and Tailwind as well.

Leave a Reply